9 Unique Chicken Coop Ideas Nobody Else Has — Worth the Extra Weekend
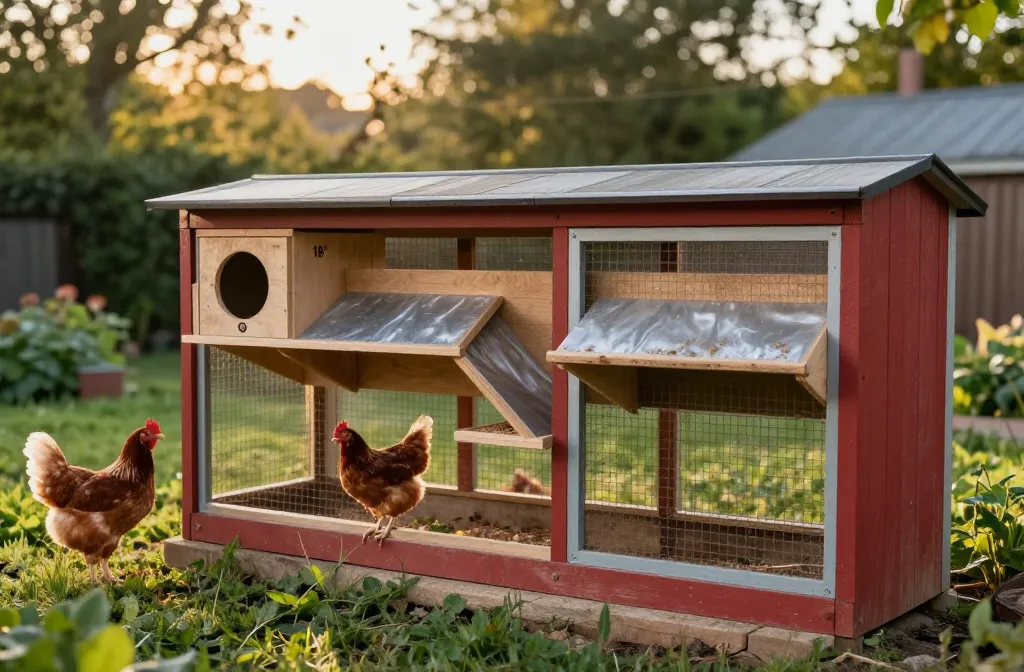
Unique chicken coop ideas sound cute until you’re the one in the feed aisle doing math on a damp receipt with a pencil nub. I’ve built and rebuilt enough to know which ideas are actually worth a whole weekend and which ones eat your Sunday and then rot by fall. The first time I chased “unique,” I stapled thrifted shutters onto a boxy coop and learned that raccoons can open those faster than I can. By the end of this list, you’ll have 9 builds and swaps you can finish with ordinary tools, real costs I paid, and how each one held up. Nothing here asks you to own a table saw or a tractor.
1. A Split-Level Roost Wall That Stays Clean Longer
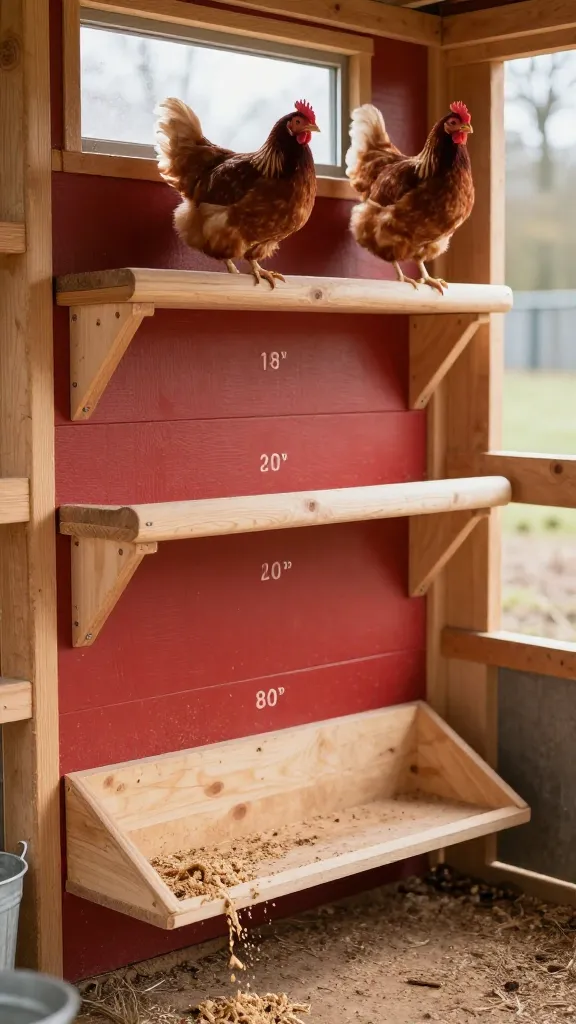
My first winter, I was scraping a flat poop board like a cafeteria tray and resenting every life choice. I wanted the roost area to clean faster than the coffee brewed. I built a stepped roost wall: two roost bars at 18″ and 30″, with a tilted catching shelf under each so droppings slide to the front edge.
I used 2×3 studs for the frame, two 8-foot lengths of 2×2 for bars, and two sheets of 1/2″ plywood cut into 12″ deep angled shelves. Materials ran about $48 in lumber and $9 for a can of barn paint. I lined each shelf with vinyl tile offcuts from the home store clearance bin for $6. It’s on year 3, and I spend 4 minutes with a paint scraper every morning. The first version was flat and warped in a month; this angled one has stayed square because I added a center brace.
Make it yours: If you’re in a damp climate, swap plywood shelves for scrap metal flashing (I spent $22 for a 10-foot roll on a second build). It wipes clean with one pass and never molds.
2. Coop Roof Skylight That Doesn’t Overheat the Birds

I wanted light without cutting more windows where wind screams through in January. The first time I tried clear panels, I baked the flock on a freak 82°F spring day and had to shade it with a towel. The fix was a narrow, vented skylight that brings in morning light but vents hot air out at noon.
I cut a 10″x48″ slot between rafters and laid in a translucent polycarbonate strip with 1″ overhangs, plus a 2″ ridge vent gap under a raised cap. The strip was $28, plus $12 for foam closure strips and $7 for butyl tape. I added a welded-wire guard under it so nothing claws through from above ($9 in 1/2″ wire). Two summers in, no leaks, no sauna. It took me 2 hours with a jigsaw and a lot of second-guessing on the ladder.
Make it yours: In hot zones, use a frosted panel instead of clear and add a removable shade from burlap or shade cloth (mine was $11). You get winter sun and summer sanity.
3. The Mud Porch: A Half-Height Run Entry That Keeps Your Shoes Dry
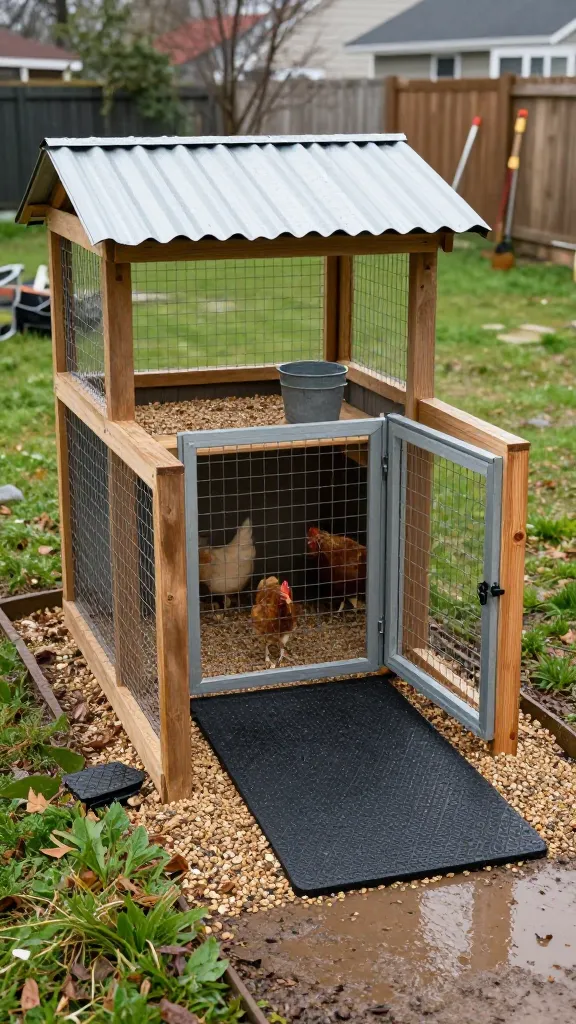
By the second rainy season, my run gate was ankle-deep in soup. I kept sliding a cinder block around like a sad stepping stone. The fix was adding a tiny covered “porch” outside the run door, like a vestibule for one muddy person and a bucket.
I staked a 3’x3′ square with treated 2x4s, filled it with 3 bags of pea gravel ($16 total on sale), topped with a scrap of hog panel, then a 24″x36″ rubber stall mat ($26). A mini roof from leftover corrugated panel and two 2×2 posts cost me $18 in odds and ends. It’s on year 2 with zero sinkholes. My first try without the wire underlayer sank in a month; with wire, the gravel stays put.
Make it yours: If you rent, build it freestanding and set it like a doormat. I framed mine so it lifts out in one 35-lb piece when the lease ends.
4. Coop-Side Feed Bin With Rain Gutter Trough
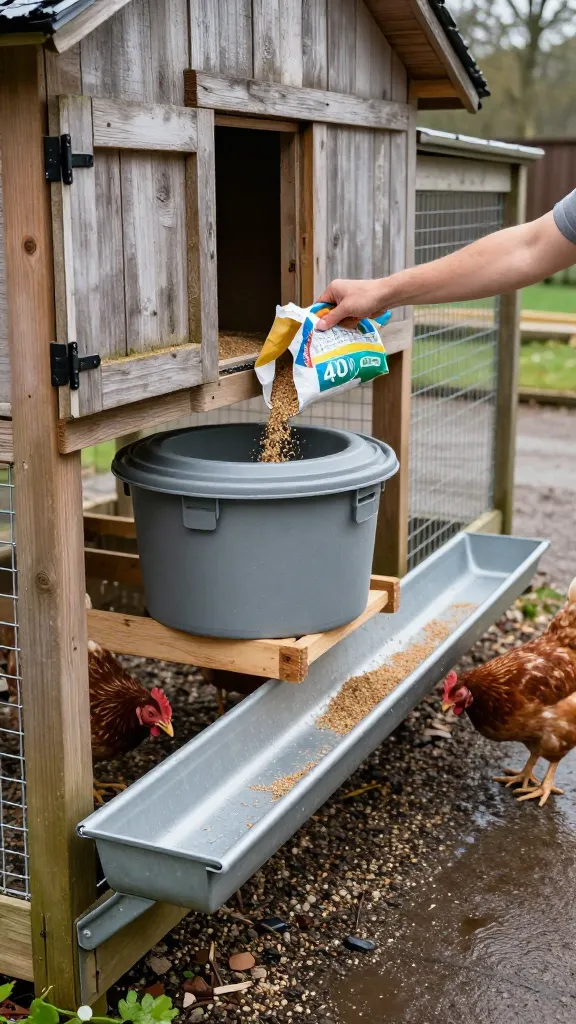
I was tired of lugging a 40-lb feed bag through the run like a pack mule. I cut a hatch in the coop’s human-side wall and set a tote inside, so I pour from the driveway. Then I added a short length of gutter as an easy-clean trough for wet days.
The bin is a contractor-grade storage tote with a gasketed lid ($24), set on a 2×4 cradle. I cut a 12″x12″ square hatch, added a hinged door with a weatherstrip ($14 in hinges and seal), and a latch. The gutter was a 4-foot section with two end caps and two hangers ($19 total). It snaps off for washing. Raccoons tried and failed; the outside hatch has a spring-loaded latch and a carabiner. My first cheap tote cracked in 2 months; the thicker one has lasted 14 months so far without swelling.
Make it yours: No gutters allowed where you are? Use a removable 24″ mortar mixing tub inside the run ($7) and dump daily—less spillage, faster cleanup.
5. The Swing-Out Nest Bank You Can Clean Without Ducking
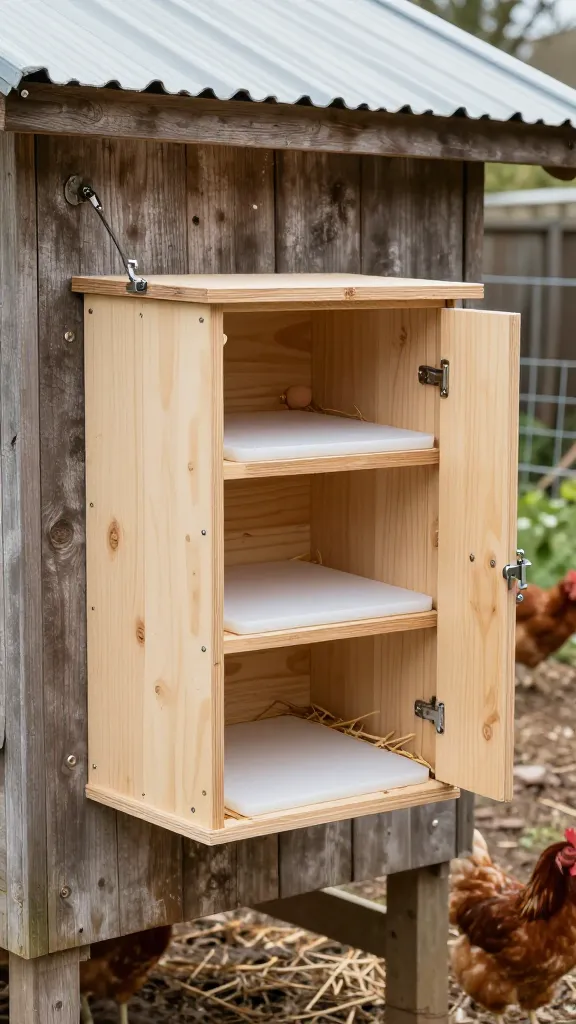
Scraping nests while bent like a paperclip is its own punishment. I built a 3-box nest bank on a piano hinge that swings out of the coop like a cabinet door, with a positive latch on both sides.
Three 12″x12″x12″ boxes from 1/2″ plywood, a 36″ continuous hinge ($16), and two gate latches ($10) came to about $42 with screws. I lined the bottoms with plastic cutting boards from a dollar store ($4 total) so I can lift and spray them. It’s held for 18 months. The only hiccup: I mounted it flush the first time and the eggs rolled out when I opened it; a 1″ lip fixed that for $0 with a scrap strip.
Make it yours: If your studs don’t land where you need, add a vertical 2×4 ledger inside first. I paid $6 for a single 8-foot stick and stopped missing screws into air.
6. A Predator Apron That Actually Stops Diggers
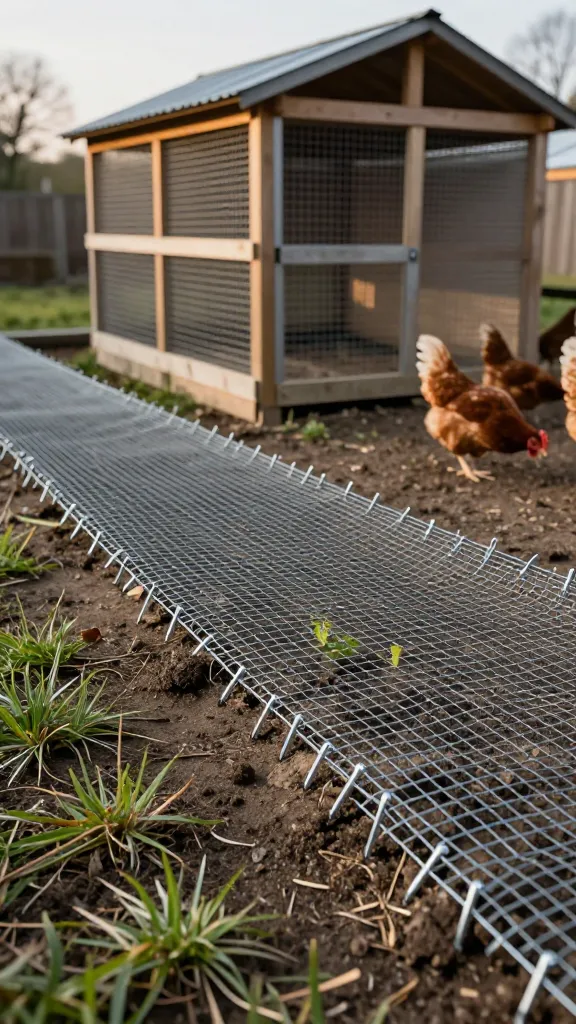
I learned about diggers the night I found a trench at the run edge like a crime scene. I used to bury wire—hours of digging—only to hit roots and quit early. The apron method took less time and worked better.
I laid 24″ of 1/2″ hardware cloth flat on the ground around the entire coop and run perimeter and pinned it with landscape staples ($34 for a 25-foot roll; $8 for staples). Then I backfilled with 1″ of soil and let grass grow through. It took me 2 hours to do 40 feet. Three years later, I still find scratch marks but no breaches. The first time I tried chicken wire to save money, it rusted and tore in 4 months; I lost sleep for free and then paid for hardware cloth anyway.
Make it yours: If you mow tight, overlap the apron with weed barrier fabric ($12) before soil so it doesn’t grab the mower blade. I learned that on a swearing Saturday.
7. Coop-Integrated Rain Catch Barrel That Actually Gets Used
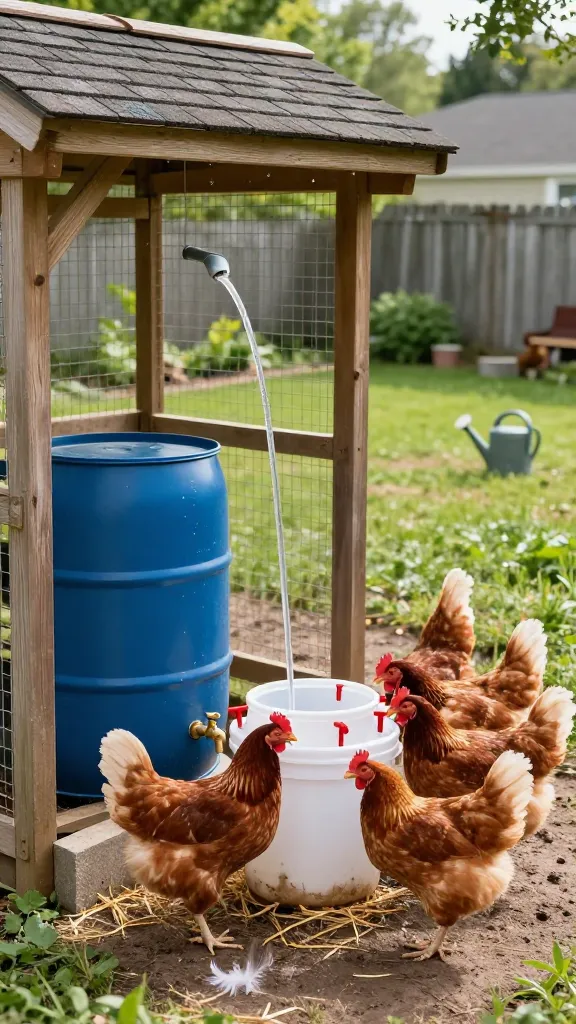
My watering can lived 60 feet from the run, and I got real creative about “tomorrow” in July. I set a small rain barrel under the coop eave and plumbed it to a horizontal nipple bucket so I refill from the barrel once a week.
The barrel was a food-grade drum from classifieds ($20 where I am), plus a downspout diverter kit ($24), a spigot ($8), and hose to the bucket ($7). The 5-gallon bucket and 4 nipples added $12. In summer, it covers 5 birds for about 6-7 days between rains. Winter catch: the barrel needs a drain-down below freezing. I cracked my first one by forgetting at 24°F and ate the $20 lesson.
Make it yours: Cold climate? Add a heated base under a metal waterer in winter and cap the barrel from December to March. Mine runs $3-5/month in power at 0.8 kWh/day in my area.
8. Window Shutters That Lock From Inside

I used to screw plywood over windows for storms and unscrew in spring, which I did exactly twice before giving up. Now I have interior-locking shutters I can swing shut and secure in 10 seconds from inside the coop, no ladder required.
Each window got a simple 1×2 frame and a matching plywood shutter on two strap hinges ($14 per window in parts). A sliding barrel bolt ($4) sits inside the coop so raccoons can’t work it. I added a 1/4″ gap and adhesive foam ($5) so they close snug without swelling. Two winters in, zero drafts and no stuck screws. My first exterior-latch attempt got iced over and I chipped a knuckle trying to open it. This setup saved me time and Band-Aids.
Make it yours: If your coop is small, do a single two-panel shutter instead of two singles; one 24″ bolt is easier to find than two 12″ bolts in the dark.
9. A Split-Shift Pop Door: Timer Plus Manual Override

The first auto door I tried stuck open the one week a raccoon family got brave. I went back to manual for a month and then built a hybrid: a spring-balanced pop door with a cheap plug-in timer and a corded manual override I can pull from outside.
I used a 12″x14″ plywood door riding in aluminum U-channel rails ($22), a cord over two pulleys ($9), a 2-lb counterweight from scrap steel, and a basic lamp timer driving a small motorized reel I salvaged ($18 for a used one; new is more). The key is the manual rope: if the timer fails, I pull and lock it with a cleat ($3). It’s run 11 months without a miss. The catch is tuning the counterweight so it won’t slam; I spent an hour swapping in washers until it set gently.
Make it yours: If motors aren’t your thing, skip it—use just the counterweight and rope, plus a dusk routine on your phone. I did that for a full summer and missed only once in a thunderstorm.
Frequently Asked Questions
Which unique chicken coop idea is the best value per hour spent?
The predator apron. It cost me about $42 all-in for 40 feet and under 2 hours solo, and it stopped every dig attempt for 3 years. Compare that to roofing or a rain barrel, which run closer to $50–$70 and take half a day.
How do I adapt these builds to a tiny yard without breaking the layout?
Go vertical: the split-level roost wall uses 12″ less floor than a flat roost/board setup, and swing-out nests keep you from needing a 3-foot aisle. My 4-hen build fits in 18 sq ft of interior space with those changes and still gives 8 sq ft per bird including the run.
Are the rain and skylight ideas safe for a coop in snow country?
Yes, if you size the openings small and flash everything. My skylight slot is 10″x48″ with a ridge cap above so snow sheds; it’s seen 12″ snow loads. The rain barrel should be drained and disconnected below 32°F to prevent cracking; I cap mine from December to March.
Can I install the predator apron if my coop is already built and occupied?
Yes. I did mine with birds inside on a Saturday afternoon. Cut 24″ strips of hardware cloth, slide under the run edge where you can, overlap sections by 6″, stake with staples every 12″, and backfill with 1″ of soil. I finished 40 feet in about 2 hours with tin snips and gloves.
What tools do I actually need to pull off most of these?
A drill/driver, tin snips for hardware cloth, a handsaw or jigsaw, a staple gun, and a measuring tape. I built everything here with those plus a square and a level. If you have a circular saw, it speeds up the nest bank and porch frames by 20-30 minutes.
Start With One Small Fix You’ll Use Every Day
If you’re staring at this list wondering where to start, pick the thing your hands touch daily. For me it was the roost clean-up; for you it might be the mud porch or the inside-locking shutters. Lay out the hardware cloth or the hinges tonight, and block off one Saturday morning—I’ve never regretted a project that cut 5 minutes off every chore.
— ask me how I know.