8 Small Chicken Coop Ideas — For Compact Yards and Tight Lots
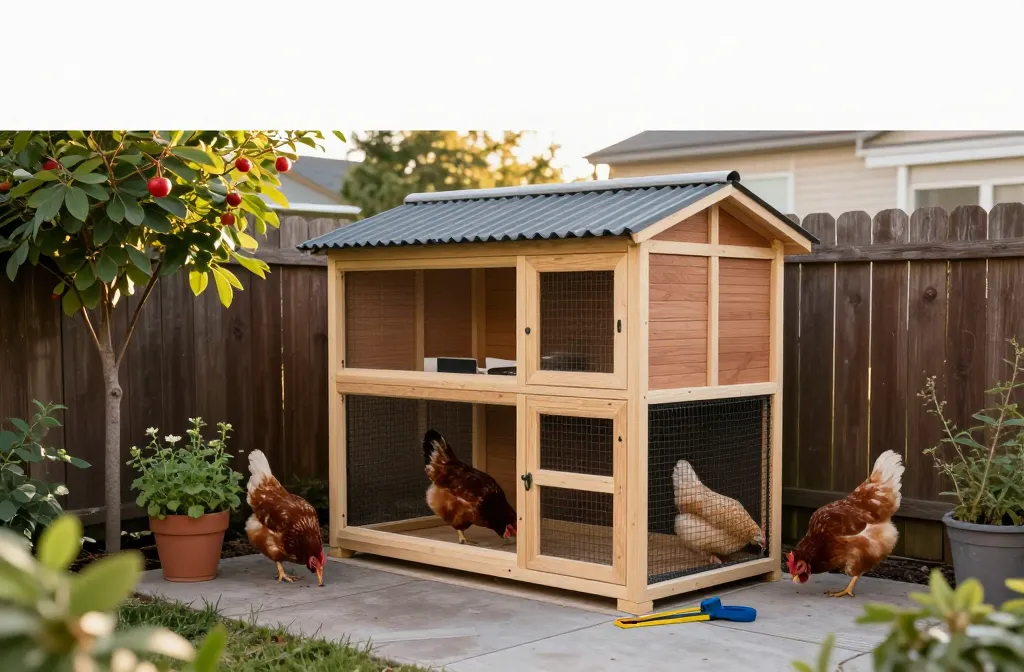
1. The 4×4 Footprint That Fits Almost Anywhere — Still Big Enough for 3–4 Hens
A 4×4 coop gives 16 square feet — enough room for 3 to 4 hens if you plan the layout carefully. Use 2×3 studs instead of 2x4s to keep weight down, add an external nest box to reclaim floor space, and slope the roof for rain shed.
Small chicken coop ideas saved my sanity the spring I tried to shoehorn four pullets into a rental yard the size of two parking spots. I opened the month with a Pinterest board and $250; by week two I was in the hardware aisle with a tape measure, muttering at a stack of 2x3s like they’d confess their price. Here’s what actually worked in a cramped space: eight builds, buys, and layout tricks I’ve run in my own yard, with what they cost me, how long they lasted, and what I’d skip. By the end you’ll have a plan you can build or buy on a normal Saturday without a table saw or a second mortgage.
I started by chalking out a 4×4 square on our patio because the grass was already spoken for by a neighbor’s fence and a cherry tree. The first time I tried this, I overbuilt with 2x4s, and the box weighed about as much as a small car. The fix was a lighter frame: 2×3 studs for the walls and base, a 3/4-inch exterior plywood floor, and a short sloped roof from corrugated panels. Lumber and ply came to $95–$130 in my area, the roof panels and screws another $40–$60, and half-inch hardware cloth for vents and windows about $45 for a 25-foot roll. That gave me a sturdy shell that’s handled two winters and a hailstorm.
The catch is packing function into 16 square feet. I put roosts diagonally and made the nest box external to reclaim interior floor. Also, do not skip the hardware cloth on every opening — wire mesh that’s larger than half-inch is a raccoon invitation. I learned that once for $60 in “cheap” materials and one very broken morning.
Make it yours: if you get summer heat, push vent openings to a combined at least 1 square foot per bird, high on two opposite walls, and add a shade sail. It cost me $18 and dropped interior temps by 4–6°F on July afternoons.
2. A-frame Mini Coop You Can Drag by Yourself — Trenchless, Rent-Friendly
An A-frame coop is lightweight, portable, and needs no foundation. Build it from 2×2 furring strips and roofing panels, add a skid base with a rope handle, and you can drag it across the yard solo to give the ground beneath a chance to recover.
I needed something I could move alone because our “lawn” was 60% patio and 40% spots the landlord liked to park on. The first A-frame I built was all 2x4s; I could barely budge it. Round two, I used 2×2 furring strips for the frame, roofing panels for the top third, and hardware cloth down the sides. Material total ran $110–$160. I added a skid base with pressure-treated 2x3s and a rope handle — no wheels needed — and I can drag it across dry grass solo.
Honest catch: A-frames cap your interior headroom. Roosts must be centered so birds don’t brush walls. In winter I tack on clear polycarbonate over the windward side; it was $28 for a small panel and made January chores tolerable without sealing out airflow.
Make it yours: if you’re on hardscape, add removable poop boards under the roosts (a 1×2 frame and thin plywood, $12–$18). They slide out for a 3-minute scrape and keep the triangular floor usable.
3. Vertical Coop: Nest Box Outside, Storage Above — Doubles the Usable Space
Building up instead of out gives you storage and keeps feed secure. A 3×5 footprint with a 6-foot height lets you add an external nest box, a hinged loft for feed storage, and still have room for the flock below.
On my second season, I was tired of tripping over feed buckets in the kitchen. I built a 3×5 footprint coop but ran it tall — just under 6 feet — with external nest boxes and a hinged storage loft over the human door. Plywood, studs, roofing, hinges, and hardware cloth came to $220–$300. The storage shelf holds a 35-lb feed bin plus grit and calcium, which freed a closet in the house and kept vermin out.
Here’s the rub: weight up high adds tip risk if you plant this on blocks. I anchored the base with four 16-inch concrete pavers ($16–$24 total) and two ground anchors ($20) run through the base frame. After one March wind that tried to introduce it to the neighbor’s trampoline, I won’t build tall without anchoring again.
Make it yours: if you’re nesting for 4 hens, a single 12x12x12 box plus a divider works fine — mine cost $14 in scraps and a hinge and reduced line fights at laying time.
4. Convertible Run-Deck: 3×6 Under-roost Scratching Zone That Stays Dry
A covered deck under the coop turns a mud problem into a dry, usable run. Build it from 2×3 joists and deck boards spaced 1/4 inch apart, top it with hardware cloth to block diggers, and add 2–3 inches of wood chips for a scratching surface that drains fast.
I used to hate the mud triangle under the roost where nothing grew and everything smelled like the inside of a boot. I finally built a 3×6 covered run deck under the coop using 2×3 joists, deck boards spaced 1/4 inch, and a layer of hardware cloth on top to block diggers. Lumber ran $60–$90, hardware cloth $25 for the portion used, and I roofed it with scraps. I toss 2–3 inches of wood chips on the deck and rake weekly; it’s dry by noon after rain.
Downside: you need to commit to cleaning. When I let it go 3 weeks, I scraped a compacted felt of shavings that weighed more than my pride. Plan 10–15 minutes every Saturday and it stays light and odor-free.
Make it yours: swap deck boards for composite slats if you can find offcuts; they hose clean in 2 minutes and won’t splinter. I picked up a bundle for $25 from a contractor’s leftovers.
5. Fold-Flat Pop-Run Panels — 12 Feet of Safe Day Space That Stores in 6 Inches
Hinged panels with hardware cloth give you a portable run that folds flat for storage. Build eight 2×4-foot panels from 1×2 frames, clip them together with carabiners, and add a roof panel for hawk cover — you get 12 feet of safe day space that stores behind the trash cans.
My first wire playpen looked fine until a raccoon peeled it open like a sardine tin. The fix was 1×2 wood frames with half-inch hardware cloth stapled tight, each panel 2×4 feet, hinged to fold like a screen. Eight panels cost me $90–$130 in wood and $45 in cloth. I clip them together with carabiners and run a hardware-cloth “roof” panel over two sections for hawk cover. The whole thing leans behind the trash cans at 6 inches deep when folded.
This is not an overnight run — it’s day-use only. I stake the corners with 12-inch garden stakes ($10) so a dog can’t shove it. First week I skipped the roof and a hawk did a slow, interested circle I didn’t enjoy. Add the roof panel.
Make it yours: if you want faster setup, replace two wood panels with galvanized livestock panels cut to 2×4 and zip-tied to the frames; they stiffen the whole run for $30–$40 more.
6. Coop On Pavers: Level, Dry, And You Can Still Get Your Deposit Back
Pavers give you a level, drainage-friendly base without digging. Set eight 16×16 pavers over a 1-inch sand bed, add a hardware cloth skirt extending 12 inches outward, and the whole setup lifts away when you move — deposit intact.
I rent, and I am fond of my security deposit. Digging a gravel pad was not an option. I leveled a base with eight 16×16 pavers over a 1-inch sand bed. Pavers ran $32–$48, sand $6–$10. The coop sits square, drains fast, and the entire thing can lift away with a dolly. I put hardware cloth “skirts” under the edges extending 12 inches outward, pinned every 12 inches with landscape staples ($8).
What I learned the hard way: set the pavers just higher than the surrounding grade, or rain will sheet under and splash your walls. I had to reset two corners after the first storm — 40 minutes of do-over that would’ve been 10 if I’d checked level diagonally the first time.
Make it yours: if frost heave is your life, swap sand for paver base and compact it; an extra $12–$18 saved me a spring re-level.
7. Inside the Build: Space-Savers That Actually Work
Smart interior layout matters more than raw square footage in a small coop. Hang a horizontal nipple waterer at hen eye-level, mount a flip-down wall feeder, and set a single 2-inch roost 12 inches from the wall — you free up floor space and cut down on mess.
I used to cram so much “helpful” gear inside that the birds had to slalom between it all. The first time I hung a waterer, I set it too low and created a cold-season foot bath. Here’s what stuck: a horizontal nipple waterer made from a food-grade bucket with 3 nipples on one side ($18–$25 all-in), hung so the nipples are at hen eye-level. A flip-down wall feeder made from a narrow bin ($12) with a lip stops the morning grain avalanche. For sleeping, a single 2-inch wide roost set 12 inches from the wall keeps tails clear.
Caveat: nipples freeze. In winter I use a heated base under a small metal waterer in the run on a timer ($40–$60). The bucket comes back in April. And I learned to keep the roost higher than the nests by at least 6 inches, or you’ll be washing eggs every day.
Make it yours: if you’re in a hot climate, mount the bucket outside with the nipples through the wall — same height, zero floor footprint, and less mess inside.
8. The Reality Math: How Many Birds Fit, and When To Say “Rehome One”
Give each hen 4 square feet inside and 8–10 square feet in the run, or behavioral problems follow. Overcrowding leads to pecking, stress, and roost fights — if your bottom hen is sleeping in the nest box, you’ve got too many birds for the space.
My first spring, I talked myself into “they’ll be small forever.” They were not. The rule that’s worked for me in compact coops is 4 square feet per bird inside and at least 8–10 square feet per bird in the run. My 4×4 coop with a 4×8 run is honest space for 3–4 hens, not 6. When I tried to run 5, the bottom hen started sleeping in the nest box and getting pecked off the roost. I rehomed one and it stopped in 48 hours. According to poultry.extension.org and Penn State Extension, laying hens need a minimum of 3–4 square feet indoors and 8–10 square feet outdoors — and that’s for well-managed flocks, not cramped ones.
Hard truth: no layout trick beats square footage. If your yard can’t swing more than a 3×6 run, keep it to 2 or 3 birds or plan real free-range time daily. Predators, weather, and neighbors limit free-range, so count run space, not “good intentions,” in your math.
Make it yours: if you’re set on 4 birds, add a second story roost platform inside — a simple 18×36 shelf with a ramp. It cost me $22 in plywood and 1×2 and gave the lowest hen a peace corner.
Frequently Asked Questions
What counts as a small chicken coop, size-wise?
I call anything with a footprint under 20 square feet “small,” so 4×4 or 3×6 boxes fit. That comfortably houses 2–4 hens if paired with a run that’s at least 8–10 square feet per bird. If you can’t hit that run number, scale your flock down or plan daily supervised yard time.
How many chickens can live in a 4×4 coop?
A 4×4 coop is honest space for 3–4 standard hens with a run of at least 4×8. I ran 5 for a month and saw pecking, night pooping in the nest boxes, and stress molts. When I dropped to 4, the drama stopped within a week.
Do small builds overheat in summer?
They can, fast. Aim for at least 1 square foot of high vent per bird, plus a shaded roof and afternoon shade on the west side. I added a light-colored roof panel and a cheap shade sail for $18 and saw a 4–6°F interior drop in July.
What’s a realistic budget to build a compact setup and run?
For a simple 4×4 coop with a 4×8 run using new materials, I’ve spent $250–$400 depending on lumber prices. Reclaimed lumber can chop that by $60–$120, but I never skimp on half-inch hardware cloth; a 25-foot roll is around $45 and it’s the line I fund first.
Is an A-frame good for tiny yards?
Yes, if you keep it light. My moveable A-frame with a 2×2 frame and a skid base cost $110–$160 and I can drag it solo. Make sure the roost is centered to avoid wall rub and add a roof or panel for hawk cover.
Can I put a coop on pavers instead of digging a foundation?
Absolutely. I leveled 8 pavers over 1 inch of sand for $38–$58 and it’s been solid through rain and one mild freeze. Add a 12-inch hardware cloth skirt around the base to deter diggers and keep the pavers a hair higher than grade so water sheds away.
Quick Comparison: 8 Small Coop Ideas
| Idea | Footprint | Best For | Approximate Cost | Key Benefit |
| 4×4 footprint coop | 4×4 (16 sq ft) | 3–4 hens in tight spaces | $180–$235 | Fits almost anywhere; handles weather well |
| A-frame mini coop | Varies | Rental yards, moveable setup | $110–$160 | Draggable solo; no foundation needed |
| Vertical coop | 3×5, 6 ft tall | Adding storage and feed security | $220–$300 | Doubles usable space; keeps feed vermin-proof |
| Convertible run-deck | 3×6 covered | Dry scratching zone under coop | $85–$115 | Stays dry; easy to clean weekly |
| Fold-flat pop-run | 12 ft linear | Portable day-use run | $135–$175 | Stores in 6 inches; predator-resistant |
| Coop on pavers | Base only | Renters, frost-prone areas | $38–$58 | Level, dry, removable for deposit return |
| Space-saver interior | — | Maximizing function inside | $30–$85 | Hanging waterer and wall feeder free floor space |
| Reality math | — | Sizing flock to space | Free | Prevents overcrowding stress and pecking |
Start Small, Build Honest
If your yard is tight, your best tool is the tape measure, not the sledgehammer. Sketch the footprint, price the hardware cloth first, and give yourself one Saturday to build the box and next Saturday to make it livable. If you only do one thing this weekend, lay the pavers and set the base — it turns “someday” into a real rectangle on the ground. For more detailed comparisons of full-scale coop designs, the coop designs comparison walks through pros and cons with pictures. If you’re working with salvaged materials, the homemade coop ideas guide shows how to build from what’s already in the garage. And when you’re ready to think about predator pressure, the predator-proofing checklist covers every weak point you might have missed.
— ask me how I know.