10 Chicken Coop Ideas — Every Direction I’d Consider Before Building
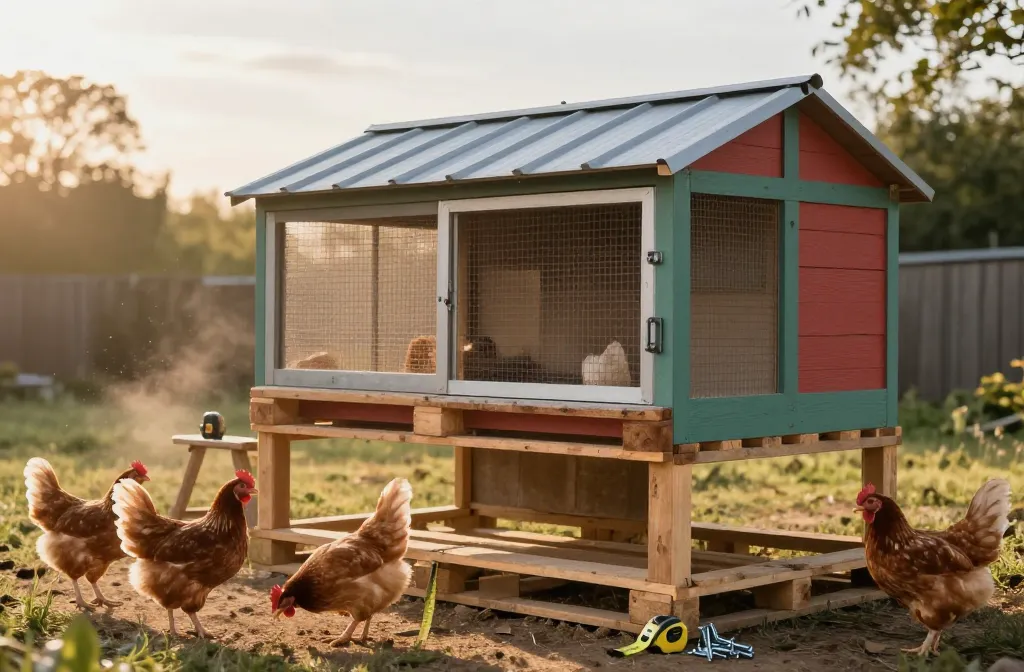
1. The Pallet-Frame Chicken Coop: Free Lumber, Real Hardware
Pallets give you a free frame, but budget for hardware cloth, roofing, and fasteners. A 6×4 pallet coop costs $160–$260 when you buy quality predator-proofing materials — and it’ll last 3+ winters if you square the corners carefully.
Chicken coop ideas are what I was scrolling at 11:40 p.m. with a tape measure in my hoodie pocket and sawdust in my hair, trying to convince myself my $200 budget could make lumber act like magic. The very next morning I stood in the feed aisle running totals on screws, hinges, and a 25-foot roll of hardware cloth like I was defusing a bomb. Here’s the honest menu I wish I’d had: 10 paths you can actually take, what they cost me (or nearly did), and how long they’ve held up. By the end, you’ll know which build, buy, or hybrid fits your yard and your Tuesday nights.
I started with four pallets and exactly one overconfident sketch. My plan was a 6×4 footprint, two nest boxes, and a roof that didn’t leak if you squinted. The pallets were free from a garden center; I brought donuts and a ratchet strap. The frame went up in an afternoon, but I burned another hour re-squaring a corner when the door wouldn’t close flush.
The spend was in the right places: a 25-foot roll of 1/2-inch hardware cloth at $45–$80 depending on gauge and the year, roof panels around $60–$90, and exterior screws + hinges + hasp right near $25–$40. Call it a $160–$260 build with found wood. It’s ugly but honest, and mine is on its 3rd winter after a coat of exterior paint I found in the oops bin for $9.
The catch: pallets are never identical. I spent an extra $18 on shims and 2x3s to make corners plumb. Also, use 1/2-inch hardware cloth, not the cheaper 1-inch mesh; I tried 1-inch once and a rat got in the brooder in under a week.
Make it yours: if you’re short on pallets, do a pallet floor and roof and frame the walls with 2x3s — I did that on a second build and it saved me an hour of cussing for about $14 more in studs.
2. Buy the Shed, Convert It Right: Time vs. Money That Actually Balances
A small resin shed is within $40 of stick-building the same space — and it comes watertight. Add $70–$120 for hardware cloth windows, a pop door, a roost, and a two-motion latch, and you’ve got a coop that handles weather and predators better than most DIY builds.
I priced lumber twice before admitting a small resin shed made more sense. The sticker was $350–$600 depending on size, which made me gulp. But when I did the math on studs, sheathing, and roofing, the shed was within $40 of stick-building the same square footage, and it came watertight.
Conversion costs were $70–$120: adding hardware cloth windows (two 10×20 cutouts), a pop door from a scrap of plywood, a 2×4 roost ($5–$8), and a latch that needs two motions ($8–$16). Mine took a weekend and has handled two windstorms that flattened my first DIY roof. It’s now a year 2 workhorse with zero leaks.
Here’s the rub: resin walls need backing for screws or they strip. I spent an extra $12 on fender washers and used cedar shims behind thin spots. Also, add a vent up high across from the door. Ammonia is not a smell you “get used to” — it’s a health hazard. According to Backyard Chickens, you want at least 1 square foot of ventilation per bird, open 24/7 and covered with hardware cloth — up high, where ammonia rises.
Make it yours: if summers run hot, cut in a second vent and staple in 1/4-inch hardware cloth behind it — my second vent dropped the interior by 4–6°F on 95°F afternoons.
3. Open-Air Coop for Mild Climates: Walls Where Weather Hits, Air Everywhere Else
Three solid walls plus one hardware-cloth side give you ventilation without dampness. Orient the open side east (away from prevailing storms), add a deep roof overhang, and put roosts at least 12 inches behind the open wall to avoid drafts.
I got sick of condensation and damp litter one November and took a jigsaw to a wall. The idea: three walls solid to the prevailing weather and one long side open, wrapped in hardware cloth and a deep roof overhang. My open side faces east, away from storms.
Material line: hardware cloth another $45–$80, furring strips $12–$20 to sandwich cloth edges, and roof overhang offcuts plus $10–$15 of brackets. Cost me roughly $80–$120 to convert a 4×8. The smell and damp were gone in 48 hours. Birds stayed dry even in sideways rain because the overhang is 14 inches.
But: open-air only works if the roosts sit out of the wind and your climate isn’t arctic. I added a removable clear panel for the top third of the open side when night temps dropped under 20°F, which was another $18 for corrugated plastic and screws. That panel pops on in 5 minutes.
Make it yours: orient the open side to your least windy direction, and put roosts at least 12 inches behind the open wall; I moved mine once and the difference in comb frostbite risk was obvious.
4. The Predator-Proof Floor: Hardware Cloth Skirt That Actually Works
A 24-inch hardware cloth skirt laid flat under mulch stops diggers better than pavers. Staple it 6 inches up the wall, let it extend outward, and cover it with soil — raccoons hit the mesh and give up within minutes.
The first time I tried to outsmart diggers, I laid pavers around the coop. A raccoon just shouldered past them like free weights. The fix that held is a hardware cloth skirt, 24 inches wide, stapled 6 inches up the wall and laid flat outward under soil and mulch.
I used one 25-foot roll of 1/2-inch hardware cloth for $45–$80 and a box of 3/4-inch poultry staples for $7–$10. Installed in under 2 hours solo with tin snips. It’s been in place 18 months with no dig-under. I’ve found three attempted tunnels that stopped right at the cloth.
This is sweaty, on-your-knees work. Wear gloves; cut edges are knives. And don’t bury it too deep. Flat and shallow defeats paws better than a vertical trench that collapses.
Make it yours: if your soil is rocky, overlap two 12-inch strips by 4 inches and stitch them with zip ties every 8 inches — it’s ugly but it lays easier around roots.
5. The Latch Combo That Beat My Raccoon
Two-motion latches stop raccoons because they can’t do two things in sequence. Add a locking barrel bolt plus a spring carabiner through the bolt’s hole, and a swivel latch over the door edge — $12–$19 total, raccoon-proof for 2+ summers.
I woke up to a pop door open and feed scattered like confetti. The hasp was still closed; the raccoon worked the carabiner. I watched security footage and wanted to send him a tiny diploma. The next day I added a second motion.
The setup is a locking barrel bolt ($6–$9) plus a spring carabiner ($3–$5) through the bolt’s hole, and a swivel latch ($3–$5) over the door edge. That’s $12–$19 total. It’s been raccoon-proof for 2 summers. They can do one thing. Two in sequence at awkward angles? Not so much.
The downside is you use two hands in winter gloves. I lost 20 seconds every morning until I mounted the bolt at chest height and kept the carabiner tethered on a short chain so I stopped dropping it in the mud.
Make it yours: if your birds free-range, put the same two-step on the run door; I skipped it once and came home to muddy paw prints and one very lucky hen on the roof.
6. Deep Litter Done Right: Less Chore, Better Winter Floors
Deep litter is a controlled composting system that reduces ammonia and generates heat. Start with 3 inches of pine shavings, add 1–2 inches every 2–3 weeks, stir the top layer twice weekly, and by winter you’ll have 8–10 inches of odor-free, composting bedding.
I tried the bare-floor-and-daily-scoop approach for one month. It stole 10 minutes every morning and still smelled like a locker room in August. Moving to deep litter felt like cheating. I lay down 3 inches of pine shavings ($6–$8 per bale) and add 1–2 inches every 2–3 weeks until I’m at 8–10 inches in winter. According to Incubator Warehouse and YardRoost, the deep litter method is a controlled composting system where bedding and droppings build up on the coop floor — the composting action below the surface generates heat and breaks down ammonia, so you scoop out the whole thing only once a year in spring.
Tool-wise, it’s a $12 bedding fork and a $5 bucket of construction-grade sweet PDZ or similar zeolite sprinkled on the high-traffic poop zones every few days. I stir the top 1–2 inches twice a week. Smell dropped to near zero and my floor stays dry underfoot. Once in spring, I pitchfork the whole thing to compost; it’s black gold in 3–4 months.
Catch: damp corners can cake. I learned to set roosts so droppings land where I can reach with the fork, and I trimmed a 1-inch lip at the doorway so litter doesn’t spill while still allowing airflow at the floor.
Make it yours: add a perforated boot tray under your waterer to keep that zone from going swampy; mine was $7 and it doubled the life of the bedding under the drinker.
7. Horizontal Nipple Waterer: , No Muck, Winter-Ready
A horizontal nipple waterer keeps water clean and eliminates daily scrubbing. Drill a food-grade bucket, install horizontal nipples at hen eye-level (14–16 inches off the floor), and in winter set it on a heated base — you’ll have clean water down to 10–12°F with minimal effort.
My first waterer was a metal fount that hens thought was a foot bath. By day 2, it was a salad of shavings and beak grime. I drilled a food-grade bucket and installed horizontal nipples. It felt like a gimmick until week 3 when I realized I hadn’t scrubbed green slime once.
Costs: a food-grade 5-gallon bucket ($5–$8), a pack of horizontal nipples ($8–$12), and a 5/16-inch drill bit if you don’t own one ($4–$6). Total $17–$26. In winter, I set the bucket on a heated base ($35–$55) and wrap the exposed section with pipe insulation ($3). It’s made it through two freezes down to 12°F with only a brief thaw needed on the coldest mornings.
Teach the birds by tapping the nipples to drip; mine figured it out in 30 minutes. Don’t hang the bucket too high — aim the nipple at hen eye level, roughly 14–16 inches off the floor for standard breeds.
Make it yours: if power is far, swap the base heater for a submersible stock-tank de-icer corded through conduit; mine was $28 on sale and kept 3 gallons liquid down to 10°F.
8. The Walk-In Height I Fought, Then Paid For Anyway
Walk-in height (6.5–7 feet) adds $60–$120 but saves your back and your head. You can mount roosts at 36–42 inches, keep nest boxes below, and still have storage up top — and ventilation becomes simpler with a continuous gap under the eaves.
I built a squat 4-foot-tall coop to “save lumber.” Six months later, I smacked my head on the cross brace for the 14th time and priced a rebuild. Doubling to walk-in height added $60–$120 in studs and siding. It paid back in fewer injuries, faster cleaning, and the ability to hang things from the rafters.
At 6.5–7 feet inside, you can mount roosts at 36–42 inches, keep nest boxes below, and still have storage up top for a $12 bucket of grit and a spare feeder. My chore time dropped by 5–7 minutes per day because I wasn’t doing the crab-walk with a scoop shovel. Also, ventilation up high is simpler: a continuous 2–3-inch gap under the eaves covered in hardware cloth cost me $9 in furring and staples.
The con: more surface area to paint and predator-proof. Budget another $10–$20 in hardware cloth for vents and a second latch. I learned that lesson when a possum climbed the compost pile and found an un-meshed soffit gap.
Make it yours: if you’re tight on footprint, go vertical with a 4×6 walk-in; it feels twice as big as a 4×8 shorty coop when you can actually stand and use shelves.
9. Mobile Tractor on Wheels: Grass, But Make It Practical
A mobile tractor gives birds fresh grass daily without destroying your yard. Build it from 2×2 framing with pneumatic wheels, add a hardware cloth predator apron that flips down at night, and you can move a 4×8 unit solo in 90 seconds.
I wanted birds on grass without tilling my yard into moonscape. The first tractor I built was too heavy; moving it felt like dragging a sofa through molasses. I rebuilt with 2×2 framing, light corrugated plastic roof, and pneumatic wheels.
Budget: $80–$120 in lumber and fasteners, $45–$80 in hardware cloth, and $25–$40 for wheels and a simple lever handle. Total $150–$240. At 4×8, I move it daily and it takes one person and 90 seconds. My pasture triangles bounce back in 3–5 days in spring.
Two warnings: you need a predator apron on a mobile unit or you move it before dusk like it’s a curfew. I added a flip-down 12-inch skirt that pins with tent stakes ($6), which adds 2 minutes per move but has kept skunks out. And tractors are weather-limited; give real shade and a wind break.
Make it yours: if your lawn is lumpy, spend the extra $12–$16 for bigger-diameter wheels; small hard casters sink and you’ll tip the waterer every other move.
10. The Run Roof That Saves Feed and Tempers Mud
A partial run roof keeps feed dry and cuts mud by 80%. Use clear corrugated panels over 2×4 purlins with a 1:12 slope, add a gutter to catch rainwater, and top the remaining run floor with 3 inches of washed sand for drainage.
After the third storm turned my run into oatmeal, I bit the bullet and roofed it. I used clear corrugated panels over 2×4 purlins with a 1:12 slope. Even a partial cover over the feeders changed everything — dry feed and dry birds mean calmer mornings.
Costs: panels and foam closures $70–$120 for a 6×12 run section, plus $20–$35 in screws and purlins if you have posts already. I added a gutter and a 5-gallon bucket to catch water for the garden ($18 total). The mud dropped by 80% where I added 3 inches of washed sand ($30–$50 delivered if you split a yard with a neighbor).
Don’t use a flat roof; it ponds and sags. And if you go clear, give shade elsewhere — I hang a $14 shade cloth for July afternoons or the hens loaf under the coop like it’s a bunker.
Make it yours: if snow is your life, switch to opaque metal and bump the slope; my friend’s clear panels survived one 6-inch snow, but I’ve seen them crack at 10 inches without support.
Frequently Asked Questions
How big should a chicken coop be for 6 hens?
Plan for at least 4 square feet per bird inside, so a simple target is 24 square feet (for example, 4×6). For the run, I’m happiest above 10 square feet per bird — 60+ square feet feels humane and reduces pecking. If your flock is a heavy breed, bump the indoor number by another 10–20%.
What’s the real cost to build a chicken coop that lasts?
For a small backyard setup, a functional build lands around $160–$260 if you source framing free and spend on hardware cloth, roofing, and latches. A shed conversion with vents and roosts typically runs $420–$720 all-in. The line item you should price first is the hardware cloth; it’s the difference between a coop and a snack bar.
Is an open-air chicken coop safe in winter?
In mild climates, yes, if the open side is protected from prevailing wind and you keep roosts 12+ inches behind the opening. I add a removable top-third panel when nights dip below 20°F and have had zero frostbite in two winters. In very cold regions, maintain high ventilation but reduce direct exposure; prioritize dry air over sealed air.
Do I really need a hardware cloth skirt or can I use pavers?
A flat 24-inch hardware cloth skirt has stopped every digger at my place for 18 months. Pavers alone didn’t — I watched a raccoon push them aside. If you already have pavers, lay them over the cloth to protect it and still get the anti-dig effect.
What’s the best way to keep water clean without daily scrubbing?
A horizontal nipple waterer on a bucket runs $17–$26 and stays clean for weeks. In winter, set it on a $35–$55 heated base or use a submersible de-icer if power is distant. Mount nipples at 14–16 inches so hens don’t have to stoop or jump.
Quick Comparison: 10 Coop Ideas
| Idea | Best For | Approximate Cost | Time to Build | Key Benefit |
| Pallet-frame coop | Budget builds with free lumber | $160–$260 | 1–2 days | Turns free pallets into a predator-resistant shell |
| Shed conversion | Skipping the build, getting watertight fast | $420–$720 | Weekend | Factory-built shell; add vents and roosts |
| Open-air coop | Mild climates, reducing ammonia | $80–$120 | 1 day | Maximum ventilation; eliminates dampness |
| Hardware cloth skirt | Stopping digging predators | $52–$90 | 2 hours | Lays flat under mulch; stops raccoons and foxes |
| Two-motion latch | Raccoon-proof doors | $12–$19 | 30 minutes | Two steps in sequence defeat clever paws |
| Deep litter method | Low-maintenance winter floors | $18–$25/year | 1 hour initial | Composts in place; generates heat; cuts ammonia |
| Nipple waterer | Clean water without daily scrubbing | $17–$26 | 30 minutes | No muck, no algae; winter-ready with heated base |
| Walk-in height | Easier chores and better ventilation | $60–$120 extra | Added during build | Stand upright; mount roosts higher; add eave vents |
| Mobile tractor | Fresh grass daily without yard damage | $150–$240 | 1–2 days | Move daily; pasture recovers in 3–5 days |
| Run roof | Dry feed and reduced mud | $90–$155 | Half day | Covers feeders; cuts mud by 80% |
Pick the One Direction You Can Finish This Month
Measure your space tonight and price your hardware cloth and roof panels first — those numbers will steer you toward build vs. convert. Then pick one weekend-sized bite: cut the vents, hang the roost, or add the predator skirt. A coop that’s 80% finished but predator-proof beats a perfect plan sitting in your notes app. For detailed comparisons of full-scale coop designs with pictures, the coop designs comparison walks through pros and cons. If you’re working with salvaged materials, the homemade coop ideas guide shows how to build from what’s already in the garage. And when you’re ready to think about every weak point in your setup, the predator-proofing checklist covers diggers, climbers, and flyers.
— ask me how I know.