10 Homemade Chicken Coop Ideas — Built From Things I Already Had
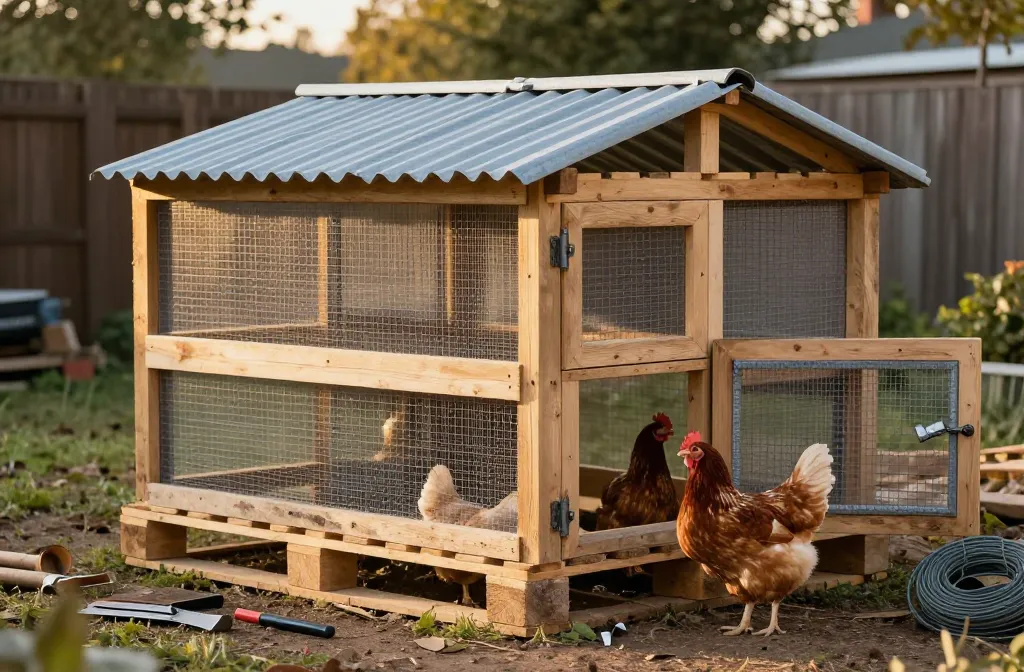
1. A Pallet-Frame Coop Wrapped in Scrap Wire
The quickest path from zero to shelter. Four pallets bolted into a box, wrapped in scrap hardware cloth, and topped with a tarp give you a predator-resistant shell in an afternoon.
My first pallet-frame coop was ugly in a way that almost offended me. Two field-corner pallets stood upright as walls, two more lay flat as floor and roof, all of it wrapped in a roll of 1/2-inch hardware cloth I had left from a garden project. The corners stuck out at odd angles. The door didn’t quite close flush. But the three pullets inside didn’t care about any of that, and by nightfall I had birds under cover.
The beauty of pallets is that they show up everywhere for free. Loading docks, feed stores, construction sites — ask and you’ll walk away with armloads. Heat-treated pallets stamped “HT” are safest for chickens; skip the ones marked “MB” (methyl bromide). A circular saw, a drill, and a handful of carriage bolts are really all you need. I’ve since learned that a second layer of wire on the floor — folded up six inches along the edges — stops a curious raccoon paw faster than anything else short of concrete.
2. A Lean-To Built Against the Existing Shed
Free square footage by borrowing a wall. A three-sided lean-to tied into an existing shed or garage wall cuts lumber costs in half and gives you a windbreak on the worst side.
The side of my shed that faces the prevailing winter wind had always been a dead zone — too exposed for storage, too drafty for anything useful. It turned out to be the perfect back wall for a lean-to coop. Two rafters tied into the existing eave, three studs on the open side, and a sloped roof of corrugated scrap metal I pulled from a neighbor’s barn renovation. The birds got a sheltered spot out of the wind. I got to skip building one wall entirely.
The trick with lean-tos is flashing. Where the new roof meets the existing wall, a simple piece of bent aluminum — scrap gutter stock works fine — keeps rain from walking behind the shed wall and rotting something you can’t see. I learned that the hard way after one wet spring. Now I check that flash line every fall before the weather turns.
3. The Scrap Sheet-Metal Roof Over a Timber Frame
Salvage roofing turns a rough frame into a weatherproof coop. Reclaimed corrugated tin from a barn teardown or remodeling job makes a roof that sheds snow and rain for decades at almost no cost.
The tin on my main coop roof came off a neighbor’s garage during a re-side job. He was going to pay to haul it away. I showed up with a cordless drill, a bag of screws with rubber washers, and a willingness to climb around on a sloped roof. Twenty minutes and thirty-something screws later, I had enough material to cover a four-by-six footprint with a generous overhang on all sides. Corrugated tin lasts forever if you don’t walk on it, and the way it sounds in a light rain — a soft, random percussion — is something I’ve come to associate with contented birds underneath.
One thing I always do with a metal roof is add a strip of closed-cell foam along the ridges. The stuff costs a few dollars at the hardware store and it keeps wasps out of the corrugation peaks, blocks dust from swirling in, and stops the ridge from whistling in certain winds. Without it, I had a family of mud daubers along one peak within a week.
4. A Repurposed Dog Crate as a Broody Pen
A large dog crate becomes a portable, predator-proof isolation pen. Wire dog crates from thrift stores or garage sales already have ventilation, a removable tray, and a latched door — everything you need for a broody hen or a sick bird.
A wire dog crate lined with straw sat in my garage for a year before I found a use for it. Then a Buff Orpington went stubbornly broody in the middle of February, and I needed somewhere to set her up with a few fertile eggs away from the rest of the flock. The crate fit perfectly in the corner of the coop, its wire walls already gave her the dark, enclosed feeling broodies seem to want, and the plastic tray pulled out for cleaning. She hatched five of six eggs. I’ve used that same crate every broody season since.
The nice thing about a crate is portability. In summer I move it into the shade of a tree and use it as a temporary run for new arrivals that need to quarantine before joining the flock. A zip-tie through the door latch stops a clever raccoon — those crate latches are famously easy for smart paws to figure out on their own.
5. A Five-Gallon Bucket Nesting Box
A food-grade bucket on its side makes a snug, private nesting box. One large bucket per two or three hens, mounted at floor level or slightly elevated, keeps eggs clean and gives hens a dark spot they’ll seek out.
I cut a round entrance in the side of a plastic bucket, lined the bottom with pine shavings, and hung it from a scrap of 2×4 with a bent piece of coat hanger wire. The hens took to it within a day. There’s something about the darkness inside a deep bucket that hens clearly like — they step in, turn around once, and settle. I’ve had zero floor eggs since I set these up, which by itself was worth the ten minutes of work.
Food-grade buckets are important. The ones that held pickles or fish bait can leach things you don’t want near your eggs. White buckets with the #2 recycle symbol, or ones labeled “food grade,” are the safe choice. A small lip of bedding at the entrance keeps shavings from spilling out every time a hen hops in. I replace the shavings once a week and give the bucket a quick scrape with a putty knife.
6. An Old Cutting Board as a Pop-Hole Door
A heavy cutting board slides in a wooden track to form a weather-tight pop door. Hardwood cutting boards are dense, smooth, and already the right size for a chicken-sized opening — just build a simple frame to guide them.
The pop-hole on my first real coop was a rectangle cut in the wall, roughly seven inches wide by ten inches tall. I needed a door that the birds couldn’t push open but that I could lift easily in the morning. An old maple cutting board — warped at one corner and too scratched for kitchen use — slid perfectly into a pair of grooves I routed into the frame on either side of the opening. Up in the morning, down at night. No hinges, no latch, no fumbling with cold fingers.
A cutting board is heavy enough to stay put in a wind and smooth enough that mites have nowhere to hide. Mine has been in service for three seasons now. When it finally starts to check or warp too much, I’ll plane it down and re-cut the groove. The wood is thick enough to handle it.
7. Hardware Cloth from an Old Garden Project
Leftover 1/2-inch hardware cloth is the single most useful predator-proofing material. Wrap any gap, vent, or run panel in it and you stop raccoons, weasels, and owls in their tracks.
Every scrap of hardware cloth I’ve ever had on hand eventually found a use on the coop. The roll I bought to protect my blueberry bushes from birds ended up wrapped around the coop’s ventilation slots, the crawlspace under the roost, and a hole a groundhog tried to dig under the run fence. According to purina.com, Penn State Extension, and the Backyard Chickens community, 1/2-inch hardware cloth is the minimum for keeping raccoon paws and weasel bodies out — smaller than chicken wire, stronger than poultry netting, and rigid enough to resist chewing.
The rule I follow: if you can fit a marble through the mesh, a predator can probably get something through it too. 1/2-inch hardware cloth stops everything short of a determined bear. For the price — a 25-foot roll costs less than most feed bags — it’s the best insurance in the flock.
8. A Rain-Gutter Feeder
A section of rain gutter with end caps becomes a long, low-profile feeder. Mount it at breast height for the hens and you get a trough-style feeder that a dozen birds can use at once without crowding.
A five-foot section of four-inch K-style gutter, capped at both ends with scrap sheet metal and silicone, suspended from two pieces of coat hanger wire bent into S-hooks — that’s the feeder that’s been in my run for two seasons now. It holds about four pounds of layer feed, and the low profile means even my smallest bantam can reach in without climbing on the lip. The birds line up along it in the morning like they’re at a buffet, and I’ve noticed less squabbling over access than I ever did with my vertical tube feeders.
The gutter needs a cover to keep rain out and to stop roosters from perching on the edge and scratching feed onto the ground. A piece of scrap tin bent into a shallow V and wired over the top does both jobs. I clean the gutter out with a stiff brush once a month — feed dust collects in the corners and can cake up if you ignore it.
9. A Feed-Bag Windbreak for the Run
Woven feed bags zip-tied to the run wall block winter wind. The bags are tough, weather-resistant, and often already printed with attractive logos — a free windbreak that lasts a full season.
The northwest side of my chicken run catches every gust that comes off the open field to the west. By the second winter, I was tired of trudging out after storms to redistribute bedding that had blown into the corner. The solution was six empty feed bags — the woven poly kind that layer feed comes in — slit open, flattened, and zip-tied to the run framing in an overlapping pattern. The wind dropped to almost nothing on the lee side. The hens started using that wall again on cold days, and I stopped losing bedding to the neighbor’s yard.
Woven feed bags are surprisingly strong. Mine lasted two winters before they started to get brittle from UV exposure. By then, the feed store had changed their bag design anyway, so I had a fresh batch to work with. Some people staple the bags instead of zip-tying them, but I like being able to remove and replace individual bags without tearing the whole wall down.
10. A Deep-Litter Floor That Composts in Place
A thick litter floor generates its own heat and needs cleaning only once or twice a year. Start with six inches of absorbent bedding, stir it weekly, and add fresh material as needed — the composting action below the surface keeps the coop warm and nearly odor-free.
I used to clean the coop floor every two weeks. It was cold work, it disrupted the hens, and I always felt like I was chasing my own shadow. Then I read about the deep-litter method and tried it on a corner of the run first. Six inches of pine shavings, stirred once a week with a garden fork, fresh material added on top when it started to look flat. The temperature under the surface, measured with a compost thermometer, sat at around 90°F even in January. The hens scratched and dust-bathed in it constantly. I haven’t done a full floor scrape in over a year — just an annual refresh in the spring.
The key is moisture control. If the litter feels damp or smells ammoniated, you’re not stirring often enough or you need to add more carbon material — dry leaves work as well as shavings. When it’s balanced, the only smell is a faint, earthy warmth, like a forest floor. The compost you scoop out in spring is perfect for the garden, broken down and full of nutrients.
Quick Comparison: 10 Homemade Coop Ideas
| Idea | Best For | Approximate Cost | Time to Build | Key Benefit |
| Pallet-frame coop | Quick starter shelter | Free – $20 | 2 – 4 hours | Instant predator-resistant shell from found wood |
| Lean-to against shed | Adding a coop to existing structures | $30 – $60 | Half a day | Uses an existing wall; saves lumber and adds windbreak |
| Scrap tin roof | Weatherproofing any frame | Free – $40 | 30 – 60 min | Durable, attractive, and sheds snow easily |
| Dog-crate broody pen | Isolation, hatching, quarantine | $10 – $25 | 15 minutes | Portable, predator-proof, and already ventilated |
| Bucket nesting box | Egg collection and privacy | Free – $5 | 10 minutes | Dark, secure, reduces floor eggs |
| Cutting-board pop door | Simple, latch-free entry | Free | 30 minutes | Heavy enough to stay shut; easy to slide open |
| Hardware cloth scraps | Predator-proofing gaps and vents | $0 – $30 | 1 hour | Stops raccoons, weasels, and owls |
| Rain-gutter feeder | High-capacity, low-waste feeding | $5 – $15 | 30 minutes | Multiple birds eat at once; easy to clean |
| Feed-bag windbreak | Blocking wind in open runs | Free | 20 minutes | Reuses waste; lasts 1 – 2 seasons |
| Deep-litter floor | Low-maintenance, warm flooring | $15 – $30/year | 1 hour initial | Generates heat; composts in place; minimal cleaning |
Wrapping Up
Every one of these ideas started with something I already had sitting in the garage, the barn, or the recycling bin. The pallets, the tin, the bucket, the cutting board — none of it was bought for the purpose. That’s the beauty of building with what’s on hand. You solve a problem with the materials in front of you, and the solution ends up having more character than anything you could have ordered from a catalog. If you’re planning a larger build, the coop designs comparison walks through full-scale options with honest pros and cons. For cold climates, pairing a deep-litter floor with one of the cold-hardy breeds makes winter almost effortless. And when you’re ready to think about predator pressure, the predator-proofing checklist covers every weak point you might have missed.
The best coop is the one you actually build, with what you have, on the weekend you have to do it. Start there. Improve it later.