Coop Security at Night — lights, locks, routines
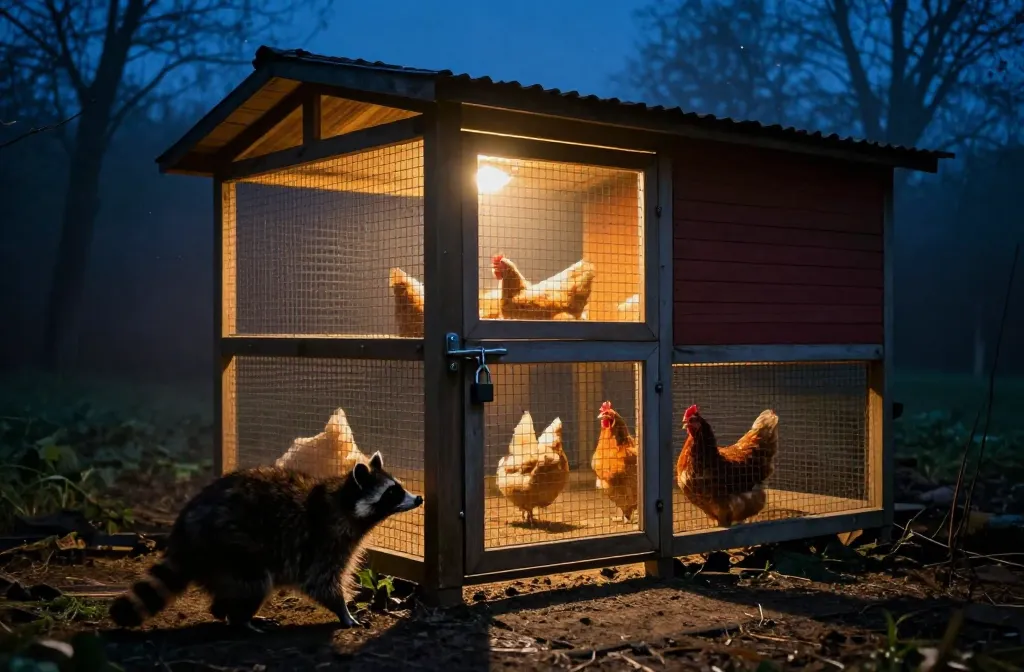
How Night Losses Actually Happen
Most night attacks start with a weak latch, a gap larger than a half inch, or a dig line with no barrier. Identify how each predator tests your coop. Raccoons use hands to work simple slide bolts and loose hooks; assume they can open anything you can with two fingers. Foxes and dogs pry and dig; they’ll follow scent and push at corners. Weasels and rats slip through openings as small as one inch and half an inch respectively. Owls and opossums exploit roof gaps and open vents. If you’ve ever found feathers at a doorway with the frame still “shut,” that was a latch failure, not a mystery predator.
As the run goes quiet and the last hen tucks her head, coop security at night is the only thing between a settled flock and a mess at dawn. Your coop security lives or dies on three systems working together: lights that don’t lure predators, locks that can’t be worked open, and routines that don’t leave gaps. I’ve replaced bent chicken wire after a raccoon peeled it up like a sardine lid; I learned fast what actually holds. By the end of this guide you’ll have the materials, measurements, and a nightly routine that keeps predators out and your hens sleeping through.
Locks That Raccoons Can’t Beat
Every exterior door and hatch gets two-step hardware a raccoon can’t operate — a spring-loaded latch plus a carabiner or padlock. On pop doors, install a throw bolt with a captive spring and add a 3-inch locking carabiner through the bolt’s hole. Human-only access doors get a locking hasp with a padlock or a keyed deadbolt. Egg hatches need the same treatment; a barrel bolt alone is not enough. After installing, grab and wrench each door at the corners; if you see more than 1/8 inch of flex at the latch side, add a second latch 12–16 inches away to pin the edge flat.
Standard: every exterior door and hatch gets two-step hardware a raccoon can’t operate — a spring-loaded latch plus a carabiner or padlock. Method: on pop doors, install a throw bolt with a captive spring and add a 3-inch locking carabiner through the bolt’s hole. Human-only access doors get a locking hasp with a padlock or a keyed deadbolt. Egg hatches need the same treatment; a barrel bolt alone is not enough. After installing, grab and wrench each door at the corners; if you see more than 1/8 inch of flex at the latch side, add a second latch 12–16 inches away to pin the edge flat.
Hardware Cloth Everywhere That Matters
Cover every opening bigger than 1/4 inch with 1/2-inch, 19-gauge galvanized hardware cloth; never use poultry netting for security. Window vents, soffits, gable ends, and any gap at the eaves get framed with 1x2s and skinned on the predator side with hardware cloth, fastened every 1.5–2 inches with heavy-duty staples or pan-head screws and washers. For runs, wrap the lower 24 inches of the fence on the outside with hardware cloth as a predator apron, then extend it out flat on the ground for 18–24 inches and pin it with landscape staples every 12 inches before backfilling with soil or gravel.
Standard: cover every opening bigger than 1/4 inch with 1/2-inch, 19-gauge galvanized hardware cloth; never use poultry netting for security. Method: window vents, soffits, gable ends, and any gap at the eaves get framed with 1x2s and skinned on the predator side with hardware cloth, fastened every 1.5–2 inches with heavy-duty staples or pan-head screws and washers. For runs, wrap the lower 24 inches of the fence on the outside with hardware cloth as a predator apron, then extend it out flat on the ground for 18–24 inches and pin it with landscape staples every 12 inches before backfilling with soil or gravel.
Coop Security Lights That Help (and Don’t Create Problems)
Use motion-activated, shielded LED lights placed to startle predators without shining into roosts; avoid leaving bright lights on all night. Mount a 300–600 lumen motion light at 6–7 feet high over the pop door and another covering the run entrance, aimed down and away from roost windows. Set sensitivity so it triggers within 15–20 feet. Add a low, warm 1800–2700K dusk-to-dawn porch glow only if you need human visibility, not for predator deterrence. Never use heat lamps as “security lights” — they’re a fire risk and attract insects, which attract predators.
Standard: use motion-activated, shielded LED lights placed to startle predators without shining into roosts; avoid leaving bright lights on all night. Method: mount a 300–600 lumen motion light at 6–7 feet high over the pop door and another covering the run entrance, aimed down and away from roost windows. Set sensitivity so it triggers within 15–20 feet. Add a low, warm 1800–2700K dusk-to-dawn porch glow only if you need human visibility, not for predator deterrence. Never use heat lamps as “security lights” — they’re a fire risk and attract insects, which attract predators.
According to Starmilling, sudden lights can spook nighttime predators and give you time to respond — mount motion-activated lights near coop entrances and around the perimeter. The Chicken Chick notes that predator deterrent systems with multiple layers of protection, including motion sensors, lights (red, blinking & motion-activated) and alarms, can be used as part of an overall strategy, though none should be relied upon as a magic bullet.
Closing Up: A Nightly Routine That Catches Mistakes
A consistent lock-up in the same order, at roughly the same time, with your eyes and hands on each stop — aim to close the pop door within 30 minutes of dark year-round. Count hens as they roost; if you free-range, train them to a 15–20 minute before-dusk scratch call in the run. Close and latch the pop door, verifying the bottom edge meets the threshold with no gap larger than 1/8 inch. Check roost and nest separation; secure vents and windows; walk the perimeter to feel for fresh digs; and finish with a hands-on latch check.
Standard: a consistent lock-up in the same order, at roughly the same time, with your eyes and hands on each stop. Method: aim to close the pop door within 30 minutes of dark year-round. Use this sequence:
- Count hens: confirm your flock number as they roost. If you free-range, train them to a 15–20 minute before-dusk scratch call in the run.
- Close and latch the pop door: verify the bottom edge meets the threshold with no gap larger than 1/8 inch.
- Check roost and nest separation: no hen sleeping in the boxes; if she is, move her to a roost and add a 4–6 inch perch lip if needed.
- Secure vents and windows: vents stay open for airflow but confirm hardware cloth is intact and frames tight; windows with screens need hardware cloth, not mesh.
- Walk the perimeter: kick along the run edge to feel for fresh digs; refill any depressions and re-pin the apron within 24 hours.
- Final latch check: hands on every latch, biner on every bolt, shake test for flex.
Pop Doors: Manual, Gravity, or Auto
A pop door must close flush with no climbable lip and lock in place; automation is a convenience, not security. For manual doors, a 3/4-inch exterior-grade plywood panel sliding in 3/4-inch u-channel or a hinged solid-core panel both work; add a 1-inch interior stop so the closed position seats against wood, not air. Gravity sliders need a 2–3 pound weight and a positive bottom stop; lock with a bolt. If you use an automatic door, choose one that locks mechanically when closed and test it monthly by placing a 1/2-inch wood strip under it to confirm the motor stalls and error-proofs. Never rely on light sensors alone; set a fixed close time and check that it beats full dark by 15 minutes.
Standard: a pop door must close flush with no climbable lip and lock in place; automation is a convenience, not security. Method: for manual doors, a 3/4-inch exterior-grade plywood panel sliding in 3/4-inch u-channel or a hinged solid-core panel both work; add a 1-inch interior stop so the closed position seats against wood, not air. Gravity sliders need a 2–3 pound weight and a positive bottom stop; lock with a bolt. If you use an automatic door, choose one that locks mechanically when closed and test it monthly by placing a 1/2-inch wood strip under it to confirm the motor stalls and error-proofs. Never rely on light sensors alone; set a fixed close time and check that it beats full dark by 15 minutes.
Roof, Eaves, and Gaps: The Quiet Entry Points
No gap larger than 1/2 inch anywhere from sill to ridge; keep ventilation, but screen it correctly. Cap corrugated roofing with foam closure strips under the ridge and along eaves; back them with hardware cloth on the interior. At door frames, add 1/2-inch door sweeps or a wood threshold so the door closes flat. Where two materials meet (roof-to-wall, wall-to-vent), back the joint with hardware cloth and cover with flashing that extends at least 2 inches past the seam. If you can fit the tip of your pinky through, a rat can, too — close it.
Standard: no gap larger than 1/2 inch anywhere from sill to ridge; keep ventilation, but screen it correctly. Method: cap corrugated roofing with foam closure strips under the ridge and along eaves; back them with hardware cloth on the interior. At door frames, add 1/2-inch door sweeps or a wood threshold so the door closes flat. Where two materials meet (roof-to-wall, wall-to-vent), back the joint with hardware cloth and cover with flashing that extends at least 2 inches past the seam. If you can fit the tip of your pinky through, a rat can, too — close it.
Run Security at Night
Assume a predator can breach a run; security comes from the coop being fully sealed at night. If your birds sleep in the run during heat waves, convert the run into a “night-safe” by roofing it with solid panels or heavy wire plus hardware cloth, skinning all sides in 1/2-inch cloth, and adding a buried or apron dig barrier. Doors get the same two-step latches as the coop. If the run is only day-safe (welded wire plus apron), then the pop door must close nightly without fail — no exceptions, even in July.
Standard: assume a predator can breach a run; security comes from the coop being fully sealed at night. Method: if your birds sleep in the run during heat waves, convert the run into a “night-safe” by roofing it with solid panels or heavy wire plus hardware cloth, skinning all sides in 1/2-inch cloth, and adding a buried or apron dig barrier. Doors get the same two-step latches as the coop. If the run is only day-safe (welded wire plus apron), then the pop door must close nightly without fail — no exceptions, even in July.
Predator-Specific Adjustments
Adjust your defenses based on the predator pressure in your area — raccoons need two-motion latches and metal feed storage; foxes need a dig barrier; weasels and rats need zero tolerance for small gaps; owls and opossums need roost-side windows closed at night. Trim branches within 8 feet of coop roofs to remove easy raccoon access. Add ground-level motion lights and a 36–48 inch kick board on the run to stop fox pry-points. Collect eggs by noon and remove all feed at night if rodents are active.
Raccoons
Use only two-motion latches, tighten all gaps below 1/2 inch, and keep feed locked in a metal can with a tight lid at least 10 feet from the coop. Trim branches within 8 feet of coop roofs to remove easy access.
Foxes and Coyotes
Prioritize your dig barrier: an apron of hardware cloth 24 inches out or a vertical trench to 12–18 inches deep with cloth turned outward. Add ground-level motion lights and a 36–48 inch kick board on the run to stop pry-points.
Weasels and Rats
Zero tolerance for small gaps: reduce openings to 1/4–1/2 inch; stuff unavoidable cracks with steel wool and cap with wood and hardware cloth. Collect eggs by noon and remove all feed at night; use a treadle feeder set to close at dusk if rodents are active.
Owls and Opossums
Close roost-side windows or add interior shutters for the night hours; ensure roof edges are tight. Keep the pop door closed before full dark; these visitors follow twilight movement.
What Fails and Why
Chicken wire, single slide bolts, and leaving feed out after dark are the three common failures. Chicken wire is for keeping chickens in, not predators out — a raccoon can tear it and a dog can punch through it; replace with hardware cloth on the vulnerable two feet and any opening. A single, simple latch is a raccoon’s puzzle toy; add the second motion. Feed smells like an invitation; bring it indoors or into a sealed metal bin every night, and clean up spilled grain within 10 minutes of lock-up.
Standard: chicken wire, single slide bolts, and leaving feed out after dark are the three common failures. Method: chicken wire is for keeping chickens in, not predators out — a raccoon can tear it and a dog can punch through it; replace with hardware cloth on the vulnerable two feet and any opening. A single, simple latch is a raccoon’s puzzle toy; add the second motion. Feed smells like an invitation; bring it indoors or into a sealed metal bin every night, and clean up spilled grain within 10 minutes of lock-up.
My One Firm Opinion
You can skip the decorative trim; you cannot skip 1/2-inch, 19-gauge hardware cloth on every opening and the lower two feet of your run.
You can skip the decorative trim; you cannot skip 1/2-inch, 19-gauge hardware cloth on every opening and the lower two feet of your run.
Maintenance That Keeps Security Tight
Inspect on a schedule — weekly for latches and edges, seasonally for structure; once a week, do a 5-minute shake test on each door and hatch, re-tighten loose screws, and check carabiners for spring tension. Every three months, walk the perimeter for erosion under the apron, re-pin any lifted cloth, and touch up bare metal to prevent rust. After any storm over 35 mph winds, recheck roof edges, ridge closures, and tree limb clearance.
Standard: inspect on a schedule — weekly for latches and edges, seasonally for structure. Method: once a week, do a 5-minute shake test on each door and hatch, re-tighten loose screws, and check carabiners for spring tension. Every three months, walk the perimeter for erosion under the apron, re-pin any lifted cloth, and touch up bare metal to prevent rust. After any storm over 35 mph winds, recheck roof edges, ridge closures, and tree limb clearance.
Night Audit Checklist: Walk It Tonight
A systematic walkthrough covers: count hens (number matches flock list); pop door closed, seated, no gap > 1/8 inch, latched and locked; access doors and egg hatches with two-step latches engaged; vents/windows with hardware cloth intact; run edge with no fresh digs and apron present 18–24 inches out; roof/eaves with no openings over 1/2 inch; motion lights aimed and test-trigger within 15–20 feet; feed removed or sealed in metal.
- Count hens: number matches your flock list.
- Pop door: closed, seated, no gap > 1/8 inch, latched and locked.
- Access doors and egg hatches: two-step latches engaged, corners tight.
- Vents/windows: hardware cloth intact, fasteners every 1.5–2 inches.
- Run edge: no fresh digs; apron present 18–24 inches out, pinned.
- Roof/eaves: closures in place, no openings over 1/2 inch.
- Lights: motion lights aimed, test-trigger within 15–20 feet.
- Feed: removed or sealed in metal; waterers cleaned of spills around the coop.
Frequently Asked Questions
Do security lights scare predators away or attract them?
Use motion-activated, shielded LEDs at 300–600 lumens aimed down; the sudden light startles most predators without advertising your coop all night. Avoid leaving bright lights on continuously — they draw insects and can stress hens trying to roost.
What’s the best lock for coop security at night?
A spring-loaded latch plus a locking carabiner or a hasp with a padlock on every exterior door. Place a second latch 12–16 inches from the first if you can flex the door edge more than 1/8 inch when you pull.
How do I predator-proof the pop door for coop security?
Ensure the door closes flush against a solid stop with no gap over 1/8 inch, then lock it with a two-step latch. If it’s a slider, add 2–3 pounds of weight and a positive bottom stop so it can’t be lifted from below.
Is 1/4-inch or 1/2-inch hardware cloth better for a coop?
1/2-inch, 19-gauge is the standard for most openings and the run apron; it resists chewing and grabbing. Use 1/4-inch where you need to exclude smaller pests (weasels, rats) in high-pressure areas like vents, but keep the gauge heavy.
Do I need to close the pop door in summer if the run is covered?
Yes. Unless your run is fully enclosed with hardware cloth on all sides and roof plus a dig barrier, treat it as day-safe only and close the pop door within 30 minutes of dark. For heat, increase ventilation in the coop rather than sleeping birds in a semi-secure run.
How far should a dig apron extend for foxes and dogs?
Lay an apron of hardware cloth flat on the ground outward from the run for 18–24 inches, pinned every 12 inches, or bury vertical cloth to 12–18 inches and turn it outward. Either method stops typical test digs at the fence line.
Quick Comparison: Night Security Systems
| System | Purpose | Installation | Effectiveness |
| Motion-activated LED lights | Startle predators, alert you to activity | Mount 6–7 feet high, aim down | High — sudden light deters most nocturnal predators |
| Two-step latches (bolt + carabiner) | Prevent raccoon manipulation | Install on all exterior doors | Very high — raccoons cannot work two-step actions |
| Padlockable hasp + padlock | Maximum security on main doors | Requires shackle clearance | Very high — keyed protection |
| 1/2-inch hardware cloth | Block all predator access | Cover every opening > 1/4 inch | Very high — resists chewing, prying, clawing |
| Dig apron (18–24 inches) | Stop digging predators | Lay flat, pin every 12 inches | High — blocks foxes, dogs, raccoons |
| Nightly routine (30 min after dark) | Consistent lock-up catches gaps | Same order, same time daily | Very high — prevents human error |
Lock It Right, Every Night
The standard is simple: two-step latches on every door, 1/2-inch hardware cloth on every opening, pop door shut by dark. Walk your coop tonight with the checklist and a pocketful of carabiners — get the latches right first, then add the apron this weekend. For the detailed breakdown on raccoon-proof locks and latches, the raccoon-proofing guide covers every latch type. For the hardware cloth specs and installation, the hardware cloth guide explains the differences. And for the full predator-proofing checklist that covers all threat types, the predator-proof checklist walks through every weak point.