Predator Apron — stop the diggers
How Digging Losses Happen
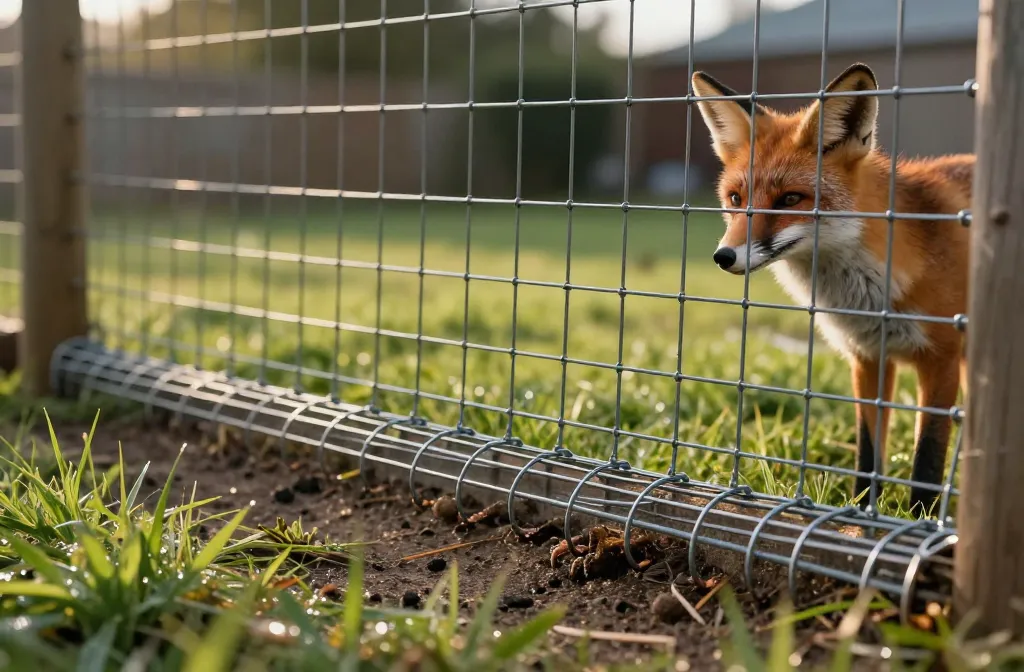
A vertical fence without a horizontal apron is an invitation — a raccoon, fox, dog, or coyote tests the base of your run at night, finds where vertical wire meets soil, then digs straight down at the fence line. With only a vertical barrier, they can get under in less than an hour. Skunks and opossums are slower but persistent; a determined raccoon will return to the same weak point for several nights. After I lost two pullets to a fox that tunneled under a 2-by-4 welded wire fence, I stopped burying wire and started laying it flat — no more tunnels.
At dusk, the ground looks quiet; by dawn, it’s been worked like a zipper by something with time and claws. A predator apron stops those diggers cold by putting a horizontal barrier of wire at ground level, extending out from your fence or coop wall so claws hit steel before they hit soil. I have re-dug runs after foxes taught me where my fence ended; the apron is what finally ended their lessons. In this guide, I’ll show you the exact mesh, width, depth (none), and fasteners that hold through freezes and mud, plus how to retrofit an apron to an existing coop in an afternoon.
Predator Apron Specs That Work
The standard is a 24–30 inch apron of 16-gauge, 1/2-inch galvanized hardware cloth laid flat on the soil, attached to the base of your fence or coop, and extending outward. That size forces the digger to start far enough from the wall that most give up; 18 inches is the minimum, 24 inches is reliable, and 30 inches is what I use along woods edges. Do not use chicken wire; its thin gauge and large openings tear under a raccoon’s pull and a dog’s bite. Where budgets are tight, you can run 19-gauge hardware cloth, but expect to add more anchors and inspect more often.
The standard is a 24–30 inch apron of 16-gauge, 1/2-inch galvanized hardware cloth laid flat on the soil, attached to the base of your fence or coop, and extending outward. That size forces the digger to start far enough from the wall that most give up; 18 inches is the minimum, 24 inches is reliable, and 30 inches is what I use along woods edges. Do not use chicken wire; its thin gauge and large openings tear under a raccoon’s pull and a dog’s bite. Where budgets are tight, you can run 19-gauge hardware cloth, but expect to add more anchors and inspect more often.
According to Wild Hearth Life, a surface-laid apron of hardware cloth extending 18-24 inches outward from the base (24 inches preferred in areas with foxes, coyotes, or free-roaming dogs) prevents digging predators from tunneling under. The Nested Coop predator-proofing guide confirms that a 12-inch hardware cloth apron around the full run perimeter is essential to stop digging predators, and that every gap larger than ¼ inch around door frames, corners, or panel seams must be sealed.
Plan the Predator Apron Before You Build
Measure your run perimeter and coop base length to calculate total linear feet; plan for one continuous apron tied to the bottom rail or sill of your structure, with overlaps of at least 6 inches where rolls meet. Keep vegetation trimmed to 2 inches or less along the fence line; tall grass hides gaps and lets animals pull unseen. If you are in freeze-thaw country, avoid burying your apron deeper than the first inch; soil heave will warp it and open gaps at the fence.
Measure your run perimeter and coop base length to calculate total linear feet. Plan for one continuous apron tied to the bottom rail or sill of your structure, with overlaps of at least 6 inches where rolls meet. Keep vegetation trimmed to 2 inches or less along the fence line; tall grass hides gaps and lets animals pull unseen. If you are in freeze-thaw country, avoid burying your apron deeper than the first inch; soil heave will warp it and open gaps at the fence.
Materials and Tools
Hardware cloth 1/2-inch mesh 16-gauge galvanized in rolls wide enough for your perimeter; fasteners including 1-inch galvanized poultry staples for wood or UV-stable zip ties plus stainless hog rings for metal; 6-inch galvanized landscape staples every 12–18 inches for ground anchors; stainless steel wire or hog rings every 6 inches for overlap ties; and 2×4 pressure-treated boards or pavers to cap the outer edge. Tools: tin snips, fencing pliers, hammer, gloves, safety glasses, tape measure.
- Hardware cloth: 1/2-inch mesh, 16-gauge galvanized, rolls in widths of 24 or 36 inches (enough for your perimeter plus overlaps)
- Fasteners to fence/coop: 1-inch galvanized poultry staples for wood, or UV-stable zip ties plus stainless hog rings for metal panels
- Ground anchors: 6-inch galvanized landscape staples or 8–10 inch tent stakes in loose soils; plan for one every 12–18 inches
- Overlap ties: Stainless steel wire or hog rings, every 6 inches along seams
- Edging weight: 2×4 pressure-treated boards or pavers to cap the apron’s outer edge (optional but useful where dogs test)
- Tools: tin snips, fencing pliers, hammer, gloves, safety glasses, tape measure
Install the Predator Apron on a New Build
Grade a 1-inch deep, 24–30 inch wide shelf around the outside of the fence line so the apron sits flat; attach hardware cloth at the base every 3–4 inches with poultry staples; extend the apron outward 24–30 inches and keep it flat with landscape staples every 12–18 inches; secure seams with hog rings or twisted wire every 6 inches; cap the outer edge with 2x4s or pavers; and backfill lightly with soil.
- Grade the perimeter. Scrape a 1-inch deep, 24–30 inch wide shelf around the outside of the fence line so the apron sits flat. Remove roots thicker than a pencil.
- Attach at the base. Unroll the hardware cloth and align one edge against the run wall or bottom board. Fasten every 3–4 inches with poultry staples into wood framing, or every wire square with zip ties to a metal panel. No gaps.
- Lay it out. Extend the apron outward 24–30 inches. Keep it flat; use landscape staples every 12–18 inches in a staggered pattern to prevent lift. In sandy or loose soil, tighten spacing to 8–12 inches.
- Secure seams. Where one roll ends, overlap at least 6 inches and join with hog rings or twisted stainless wire every 6 inches across the seam.
- Cap the edge (optional but strong). Lay a line of 2x4s or pavers along the outer edge of the apron. Screw boards together end-to-end, or bed pavers into soil to sit flush so you can mow over them.
- Backfill lightly. Pull the scraped soil back over the apron just enough to cover the wire. Final grade should be flush to avoid a mower-catching lip.
Retrofit a Predator Apron to an Existing Coop or Run
If your structure is standing, you can add the predator apron without tearing anything apart — rake back mulch or stones first, cut wire in manageable 6–8 foot sections, attach the hardware cloth to the base with poultry staples every 3 inches, stake the outer edge with landscape staples every 12 inches, and pre-bend the hardware cloth into a shallow “L” for uneven ground.
If your structure is standing, you can add the predator apron without tearing anything apart. Rake back mulch or stones first. Cut wire in manageable 6–8 foot sections; long pieces kink and fight you. Attach the hardware cloth to the base with poultry staples every 3 inches (pre-drill pilot holes in very hard wood), then stake the outer edge with landscape staples every 12 inches. Where the fence sits on uneven ground, pre-bend the hardware cloth into a shallow “L” and fill low spots with packed soil to eliminate daylight under the bottom rail.
Gateways, Corners, and Odd Angles
Gates are the place predators test first — continue the predator apron straight across the gate opening and cut it into two flaps that overlap at the center by 4–6 inches; at corners, run one apron past the corner by 12 inches and overlap the adjoining run by 6 inches; for posts set on pads, wrap the post with a 6-inch collar of hardware cloth and tie that collar into the apron with wire.
Gates are the place predators test first. Continue the predator apron straight across the gate opening and then cut it into two flaps that overlap at the center by 4–6 inches. Attach each flap to the gate bottom with screws and fender washers, or hog ring to a gate frame, so the flaps lift as the gate swings and then fall back to cover the gap. At corners, run one apron past the corner by 12 inches and overlap the adjoining run by 6 inches; tie them together every 4–6 inches to stop pry points. For posts set on pads, wrap the post with a 6-inch collar of hardware cloth and tie that collar into the apron with wire.
Coop Perimeter vs. Entire Run
If your birds are locked in a secure coop every night, a predator apron around the coop alone will stop most nocturnal losses; if you leave the pop door open or your run is your overnight space, apron the entire run perimeter. On tractor-style runs you move weekly, you cannot apron the ground; in that case, line the lower 24 inches of the tractor skirt with hardware cloth and add a 12–18 inch inward-facing internal skirt on the floor to deter initial digs.
If your birds are locked in a secure coop every night, a predator apron around the coop alone will stop most nocturnal losses. If you leave the pop door open or your run is your overnight space, apron the entire run perimeter. On tractor-style runs you move weekly, you cannot apron the ground; in that case, line the lower 24 inches of the tractor skirt with hardware cloth and add a 12–18 inch inward-facing internal skirt on the floor to deter initial digs.
Mesh, Gauge, and Why Chicken Wire Fails
The standard choice is 1/2-inch, 16-gauge hardware cloth — the small opening stops paws and prevents a raccoon from grabbing through to tear or bend; 1/4-inch mesh works but is harder to lay flat and more expensive; 1-inch welded wire can serve as a secondary top layer above hardware cloth to add stiffness in sandy soils. Chicken wire on an apron is a failure waiting to happen — it kinks, rusts through, and dogs punch under it in minutes.
The standard choice is 1/2-inch, 16-gauge hardware cloth. The small opening stops paws and prevents a raccoon from grabbing through to tear or bend. 1/4-inch mesh works but is harder to lay flat and more expensive; 1-inch welded wire can serve as a secondary top layer above hardware cloth to add stiffness in sandy soils. On an apron, it kinks, rusts through, and dogs punch under it in minutes.
Soils, Frost, and Drainage
Clay soils hold staples well; sandy soils do not — in sand, increase stake length to 10 inches and spacing to 8–12 inches, and strongly consider the 2×4 or paver edge; in freeze-thaw climates, keep the apron shallow by covering with no more than 1 inch of soil so frost heave moves the whole plane together; where water collects, slit the apron every 24–36 inches across grade and overlap those slits by 6 inches downhill so water can pass without lifting the mesh.
Clay soils hold staples well; sandy soils do not. In sand, increase stake length to 10 inches and spacing to 8–12 inches, and strongly consider the 2×4 or paver edge. In freeze-thaw climates, keep the apron shallow: cover with no more than 1 inch of soil so frost heave moves the whole plane together. Where water collects, do not create a dam; slit the apron every 24–36 inches across grade and overlap those slits by 6 inches downhill so water can pass without lifting the mesh.
Inside vs. Outside Apron Placement
Outside placement is the standard — easier to install, easier to mow, and it stops the dig before it starts; an inside apron is a second line if you have an existing outside barrier you don’t want to disturb, or if you face heavy dog pressure. For inside aprons, lay a 12–18 inch skirt just under the bedding and staple it to the inner base; cover with 2–3 inches of sand or gravel so birds aren’t walking on bare wire.
Outside placement is the standard: easier to install, easier to mow, and it stops the dig before it starts. An inside apron is a second line if you have an existing outside barrier you don’t want to disturb, or if you face heavy dog pressure. For inside aprons, lay a 12–18 inch skirt just under the bedding and staple it to the inner base; cover with 2–3 inches of sand or gravel so birds aren’t walking on bare wire.
Anchoring and Fastening That Doesn’t Let Go
Fasten the wire-to-wood connection at least every 3–4 inches; for metal, use UV-stable zip ties backed up with stainless hog rings every 6 inches; ground anchors are your insurance — plan one every 12–18 inches, closer in the first 6 feet from corners where pressure concentrates; if a dog has already started a dig, double up anchors to every 6–8 inches for that section and cap with a 2×4 edge.
Fasten the wire-to-wood connection at least every 3–4 inches. For metal, use UV-stable zip ties now and replace yearly, but back them up with stainless hog rings every 6 inches. Ground anchors are your insurance; plan one every 12–18 inches, closer in the first 6 feet from corners where pressure concentrates. If a dog has already started a dig, double up anchors to every 6–8 inches for that section and cap with a 2×4 edge.
Retaining Edges You Can Mow
If you want clean lines and easy trimming, cap the apron with a row of 1.5–2 inch thick pavers laid flush with lawn height, leaving 1/8 inch gaps between pavers for drainage; a cedar or treated 2×4 screwed to stakes every 3 feet also works and lets you weed-whack right up to it.
If you want clean lines and easy trimming, cap the apron with a row of 1.5–2 inch thick pavers laid flush with lawn height. Leave 1/8 inch gaps between pavers for drainage. A cedar or treated 2×4 screwed to stakes every 3 feet also works and lets you weed-whack right up to it.
Common Mistakes That Cost Birds
Building the apron only 12 inches wide invites a fox to learn a new trick; skipping anchors lets frost or roots lift a corner; using chicken wire or light 19–20 gauge mesh means the first strong dog will peel it back; leaving gaps at gates or not overlapping seams by 6 inches creates built-in pry points. My firm opinion: you can economize on trim and paint; you cannot economize on hardware cloth gauge.
Building the apron only 12 inches wide invites a fox to learn a new trick. Skipping anchors lets frost or roots lift a corner; all it takes is 1 inch of daylight for a raccoon to start. Using chicken wire or light 19–20 gauge mesh means the first strong dog will peel it back. Leaving gaps at gates or not overlapping seams by 6 inches creates built-in pry points. My firm opinion: you can economize on trim and paint; you cannot economize on hardware cloth gauge.
Maintenance: A Five-Minute Monthly Check
Walk the perimeter once a month, more often in spring when digging starts; look for lifted edges, rust at staples, broken zip ties, and fresh scrapes; re-staple any section where you can slip a putty knife under the wire more than 1/4 inch; after storms that drop branches, recheck corners where weight can shear fasteners.
Walk the perimeter once a month, more often in spring when digging starts. Look for lifted edges, rust at staples, broken zip ties, and fresh scrapes. Re-staple any section where you can slip a putty knife under the wire more than 1/4 inch. After storms that drop branches, recheck corners; weight can shear fasteners you thought were permanent.
When Predators Get Smarter
If something persists after you install a predator apron, assume you have multiple threats — add a 12–18 inch inside skirt at hot spots, install a second course of 2×4 cap boards, and set a trail camera for two nights to confirm species before you adjust more. For coyotes and dogs, a hot wire mounted 6 inches off the ground and 6 inches out from the fence is effective when combined with the apron. Never pursue or handle wildlife; if you’ve got repeated breaches, contact your local extension or wildlife control for legal guidance.
If something persists after you install a predator apron, assume you have multiple threats. Add a 12–18 inch inside skirt at hot spots, install a second course of 2×4 cap boards, and set a trail camera for two nights to confirm species before you adjust more. For coyotes and dogs, a hot wire mounted 6 inches off the ground and 6 inches out from the fence is effective when combined with the apron. Never pursue or handle wildlife; if you’ve got repeated breaches, contact your local extension or wildlife control for legal guidance.
Audit Your Perimeter Tonight
A systematic audit covers: measure apron width in place (aim for 24–30 inches); check fastening spacing (every 3–4 inches to the wall, every 12–18 inches to the ground); confirm mesh is 1/2-inch, 16-gauge hardware cloth, not chicken wire; verify gates overlapped by 4–6 inches and fall closed; check seams overlapped 6 inches and tied every 6 inches; confirm outer edge capped or anchored tightly with no daylight anywhere.
- Measure apron width in place: aim for 24–30 inches.
- Check fastening spacing: every 3–4 inches to the wall, every 12–18 inches to the ground.
- Confirm mesh: 1/2-inch, 16-gauge hardware cloth, not chicken wire.
- Gates overlapped by 4–6 inches and fall closed.
- Seams overlapped 6 inches and tied every 6 inches.
- Outer edge capped or anchored tightly, no daylight anywhere.
Frequently Asked Questions
How wide should a predator apron be to stop foxes and raccoons?
24 inches is the working minimum; 30 inches is better along woodlines or where dogs roam. Anything under 18 inches is a known failure point for determined diggers.
What mesh and gauge for a Predator Apron?
Use 1/2-inch, 16-gauge galvanized hardware cloth. It resists pulling and bending and keeps paws from reaching through. Lighter 19–20 gauge is a compromise you’ll need to anchor more tightly and inspect more often.
Do I need to bury the predator apron?
No. Lay it flat at grade and cover with about 1 inch of soil or mulch. Burying deeper invites frost heave to open gaps where the apron meets the fence.
Can I add a Predator Apron to an existing run without tearing it apart?
Yes. Cut 6–8 foot sections, attach to the base every 3–4 inches, and stake the outer edge every 12–18 inches. Overlap seams by 6 inches and tie them every 6 inches.
Will a predator apron stop my neighbor’s dog?
It stops most digs when built to 24–30 inches wide and anchored tightly. For heavy dogs, add a 2×4 or paver cap on the outer edge and tighten ground stakes to every 8–12 inches in that zone.
How do I handle a gate with a Predator Apron?
Install two overlapping flaps of hardware cloth under the gate, each extending 12–15 inches from the gate bottom, with a 4–6 inch overlap at center. They lift as the gate swings and fall closed to cover the dig line.
Quick Comparison: Predator Apron Installation Methods
| Method | Installation | Best For | Limitations |
| Surface-laid apron (24–30 inches) | Lay flat on soil, pin every 12–18 inches, cover with 1 inch soil | All predator types, easiest installation | Visible at ground level, requires vegetation control |
| Buried vertical trench (12–18 inches deep) | Dig trench, insert hardware cloth vertically, bend outward at bottom | High dig pressure, permanent installation | Labor-intensive, frost heave can open gaps |
| Inside skirt (12–18 inches) | Lay under bedding, staple to inner base, cover with 2–3 inches sand/gravel | Existing outside barrier, heavy dog pressure | Requires removing bedding, birds walk on wire if not covered |
| L-shaped combination | Vertical 12 inches + horizontal 18–24 inches | Maximum protection, coyote/dog pressure | Most expensive, complex installation |
| Tractor-style internal skirt | Line lower 24 inches of tractor skirt, add 12–18 inch inward-facing skirt | Movable runs that cannot be aproned | Less effective than fixed apron, requires frequent moves |
Do it right once
The standard is simple: a 24–30 inch wide, 1/2-inch, 16-gauge hardware cloth predator apron, fastened tight at the wall and anchored every 12–18 inches. If you do one thing tonight, walk your fence with a flashlight and mark any spot where you see daylight or loose soil; that’s where you start. Cut one section, attach it every 3 inches, and keep going around the perimeter until the digging stops. For the full predator-proofing checklist that covers all threat types, the predator-proof checklist walks through every weak point. For the hardware cloth specs and installation details, the hardware cloth guide explains the differences. And for the locks and latches that pair with the apron to complete the defense, the raccoon-proofing guide covers the details.