Hardware Cloth vs Chicken Wire — the guide
The Standard: What Each Material Is For
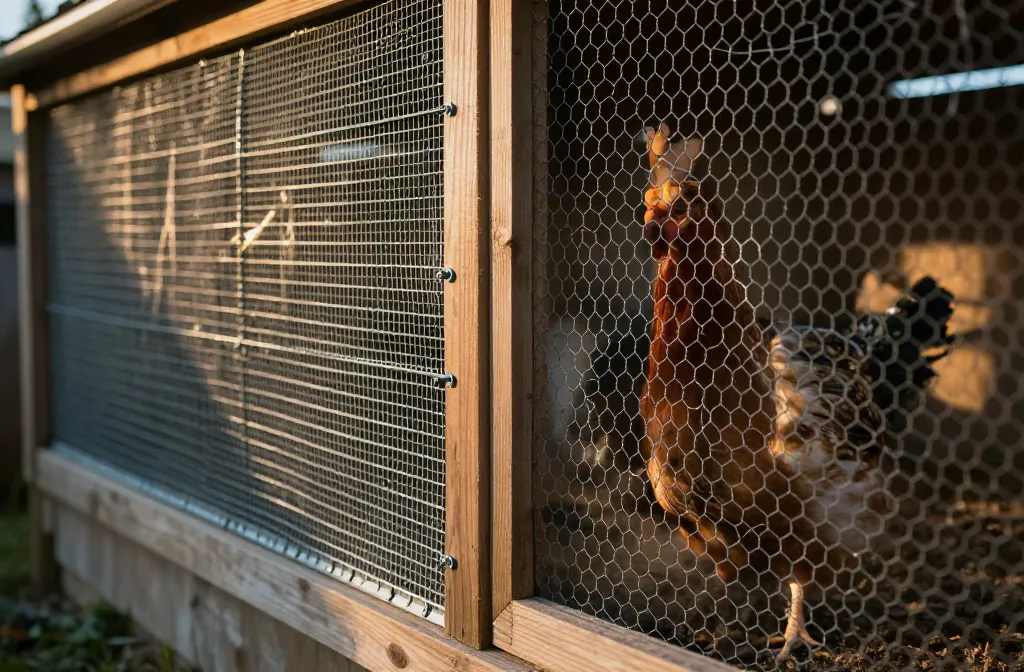
Hardware cloth (galvanized, welded wire mesh, 1/2-inch openings, 19 gauge or thicker) keeps predators out; chicken wire (hex mesh, 1-inch or 2-inch openings, 20–22 gauge) only keeps chickens in. Hardware cloth resists chewing, prying, and clawing; chicken wire does not. Use hardware cloth on the coop, the first 3 feet of run walls, the full skirt or trench, and every opening. Use chicken wire only as a secondary interior barrier or for temporary day partitions where nothing is trying to get in.
At dusk, the coop goes quiet, and that’s when predators start testing your decisions. The difference between hardware cloth and chicken wire is the difference between a safe flock and a ripped-open run. I have patched a run after a raccoon peeled chicken wire like a sardine lid. By the end of this guide, you’ll know exactly where each material belongs, the mesh size and gauge that hold up, how to fasten it correctly, and what to skip so you only build this once.
Hardware Cloth: Specs That Actually Stop Predators
The working spec for predator-proofing is 1/2-inch hardware cloth, 19 gauge minimum; step down to 1/4-inch mesh for weasels and snakes, or up to 16 gauge for heavy predator pressure. Avoid “lightweight” 23–24 gauge rolls — they crease, fatigue, and tear at staples. According to Wild Hearth Life, the 23-gauge version sold at big-box stores is not predator-rated and can be torn open by raccoons and dogs, so stick with 19-gauge or heavier.
The working spec for predator-proofing is 1/2-inch hardware cloth, 19 gauge minimum. If you have weasels or snakes under 1 inch in diameter, step down to 1/4-inch mesh on vents and small openings, but expect reduced airflow; compensate with more vent area. For heavy pressure from raccoons, foxes, and dogs, 16 gauge is a buy-once splurge that holds shape against prying and snow load. Avoid “lightweight” 23–24 gauge rolls — they crease, fatigue, and tear at staples.
Chicken Wire: Where It’s Acceptable (and Where It Fails)
Chicken wire is acceptable only for internal partitions and temporary day pens used when you’re present — it is not a security barrier. A raccoon can tear through 20–22 gauge hex mesh in minutes; dogs and foxes can rip it or pop the twists. It also sags under snow and catches wind like a sail. If you already have a run in chicken wire, overlay it with hardware cloth for the lower 36 inches and add a hardware cloth skirt; don’t rely on it overnight.
Chicken wire is acceptable for internal partitions (broody breaks, garden fencing inside a perimeter that’s already predator-proof), and for temporary day pens used only when you’re present. It is not a security barrier. A raccoon can tear through 20–22 gauge hex mesh in minutes; dogs and foxes can rip it or pop the twists. It also sags under snow and catches wind like a sail. If you already have a run in chicken wire, overlay it with hardware cloth for the lower 36 inches and add a hardware cloth skirt; don’t rely on it overnight.
Openings, Vents, and Windows: Sizes, Placement, and Fasteners
Every opening larger than 1/2 inch needs hardware cloth; frame it with solid lumber and secure every 2–3 inches with 1-inch exterior screws and fender washers, not staples alone. Place permanent ventilation as high as possible under the roof eaves on opposing walls to create crossflow. If you need winter draft control, hinge a solid cover that closes down to a 1–2 inch gap while mesh stays in place year-round.
Every opening larger than 1/2 inch needs hardware cloth. For vents and windows, frame the opening with solid lumber, sandwich the mesh between frame and stop strips, and secure every 2–3 inches with 1-inch exterior screws and fender washers (1/4-inch hole, 1-inch diameter). Staples alone are not a security fastening; use 1-inch, 16-gauge crown staples only as a temporary hold while you screw off the perimeter. Leave no gap larger than 1/4 inch at corners or laps.
Place permanent ventilation as high as possible under the roof eaves on opposing walls to create crossflow. If you need winter draft control, hinge a solid cover that closes down to a 1–2 inch gap while mesh stays in place year-round.
Runs and Walls: Height, Lower Zone Armor, and Overlays
The lower 36 inches of any run wall is the attack zone — cover it in 1/2-inch, 19-gauge hardware cloth fastened to studs every 6 inches with washered screws; above that, you can economize with welded wire panels if the roof is secure. For an existing chicken-wire run, overlay from grade to at least 36 inches with hardware cloth, tie every 8 inches using stainless steel zip ties or 16-gauge galvanized wire, and add a rigid top or hardware-cloth lid to stop climb-ins.
The lower 36 inches of any run wall is the attack zone. Cover that band in 1/2-inch, 19-gauge hardware cloth, fastened to studs or posts every 6 inches with washered screws. Above 36 inches, you can continue hardware cloth to the top for full protection; if you must economize, a welded wire panel with 2-by-4-inch openings can work above the armored band, but only if the roof is secure and you have no small-predator pressure.
For an existing chicken-wire run, overlay from grade to at least 36 inches with hardware cloth, tie every 8 inches using stainless steel zip ties or 16-gauge galvanized wire, and add a rigid top or hardware-cloth lid to stop climb-ins. Replace sagging spans longer than 4 feet with mid-span framing.
Dig Defense: Skirts vs. Trenches
The standard is a hardware cloth apron 18–24 inches wide, laid flat and pinned every 12 inches, or a trench sunk 12 inches deep with an outward lip — aprons outperform trenches in clay or frost-heave soils. I switched from trenches to aprons after a January freeze popped a 10-foot trench line an inch open; the apron I installed the next spring has carried through four winters without a single dig-through.
The standard is a hardware cloth apron or trench to stop digging. For an apron, extend 1/2-inch, 19-gauge mesh out from the base of the run or coop wall for 18–24 inches, laid flat on the soil and pinned every 12 inches with 6-inch landscape staples, then bury under 2–3 inches of soil or gravel. For a trench, sink mesh vertically to a depth of 12 inches and bend a bottom lip outwards 6 inches. Aprons outperform trenches in clay or frost-heave soils because they don’t lift and crack.
I switched from trenches to aprons after a January freeze popped a 10-foot trench line an inch open; the apron I installed the next spring has carried through four winters without a single dig-through.
Doors, Latches, and Gaps: Where Breaches Actually Happen
Doors and corners fail first — use solid frames with 1/2-inch hardware cloth fully framed-in, fit doors with two-step latches (spring-loaded hasp plus carabiner or keyed latch), and maintain no more than 1/4-inch clearance around the pop door. On large human doors, add a third hinge and a bottom slide bolt pinning into a receiver tube. If wind routinely gusts over 30 mph, add a top latch to prevent racking and hinge screws backing out.
Doors and corners fail first. Use solid frames with 1/2-inch hardware cloth fully framed-in, and fit doors with two-step latches (spring-loaded hasp plus carabiner or keyed latch). Raccoons can open simple barrel bolts; they cannot work a dual-action setup reliably. Maintain no more than 1/4-inch clearance around the pop door and cover any sliding track openings with brush seals or overlapping mesh.
On large human doors, add a third hinge and a bottom slide bolt pinning into a receiver tube. If wind routinely gusts over 30 mph, add a top latch to prevent racking and hinge screws backing out.
Roofing and Overhead Protection
A secure run roof is either a solid panel or hardware cloth stretched across rafters on 24-inch centers and fastened every 6 inches — do not roof a run with chicken wire; climbing predators and owls push through. If snow loads top 10 pounds per square foot in your area, use solid roofing with a pitch of at least 3:12 and support rafters accordingly.
Predators come from above too. A secure run roof is either a solid panel (metal, polycarbonate) or hardware cloth stretched across rafters on 24-inch centers and fastened every 6 inches with washered screws. Do not roof a run with chicken wire; climbing predators and owls push through. If snow loads top 10 pounds per square foot in your area, use solid roofing with a pitch of at least 3:12 and support rafters accordingly.
Climate, Corrosion, and Cleaning
Use galvanized after welding (GAW) hardware cloth where possible; within 10 miles of salt air, expect surface corrosion within 2–3 years and plan to rinse mesh with fresh water each season. In ammonia-heavy coops, increase ventilation and hose down mesh monthly in summer; trapped dander holds moisture against wire and shortens its life.
Use galvanized after welding (GAW) hardware cloth where possible; the zinc coating over the welds resists rust far longer than galvanized-before-weld (GBW). Within 10 miles of salt air, expect surface corrosion within 2–3 years and plan to rinse mesh with fresh water a few times each season. In ammonia-heavy coops, increase ventilation and hose down mesh monthly in summer; trapped dander holds moisture against wire and shortens its life.
Installation: How to Fasten Hardware Cloth So It Stays Put
Frame first, then mesh — cut with aviation snips or a cutoff wheel, leave 1–2 inches extra for a folded hem, and fasten every 2–3 inches on edges with 1-inch exterior screws and fender washers; where panels meet, overlap by at least 2 squares and stitch every 4 inches. On concrete or masonry, set a treated bottom plate with 3/16-inch Tapcon anchors at 16 inches on center, then screw mesh to the plate. Avoid relying on adhesives; temperature swings and dust make them fail.
Frame first, then mesh. Cut hardware cloth with aviation snips or a cutoff wheel for clean edges; leave 1–2 inches extra for a folded hem. Hemming prevents razor edges and triples the stiffness at fastener lines. Fasten every 2–3 inches on edges and every 6–8 inches on intermediate studs with 1-inch exterior screws and 1-inch fender washers. Where panels meet, overlap by at least 2 squares (1 inch) and stitch with 16–18 gauge galvanized tie wire every 4 inches.
On concrete or masonry, set a treated bottom plate with 3/16-inch Tapcon anchors at 16 inches on center, then screw mesh to the plate. Avoid relying on adhesives; temperature swings and dust make them fail.
Cost Triage Without Compromising Safety
If you need to phase the project, prioritize openings and doors first, then the lower 36 inches of run walls, then the dig-proof apron, then the roof, then upper walls — buy mesh in the widest roll you can manage for fewer seams and faster installation. My firm opinion: You can skimp on the coop paint. You cannot skimp on the hardware cloth.
If you need to phase the project, prioritize in this order: 1) openings and doors, 2) lower 36 inches of run walls, 3) dig-proof apron, 4) roof, 5) upper walls. Buy mesh in the widest roll you can manage; fewer seams mean fewer weak points and faster installation. Save money by using chicken wire only for non-predator loads like an interior chick area inside the main coop.
My firm opinion: You can skimp on the coop paint. You cannot skimp on the hardware cloth.
Common Failures and How to Fix Them
Sagging panels need vertical studs at 24-inch centers and re-stretched mesh; torn staple lines need washered screws every 2–3 inches; gaps at roof-wall intersections need a continuous strip of hardware cloth bent to 90 degrees and screwed along both legs. Predator chewing at corners needs exposed edges capped with 1×2 lumber screwed through to framing every 8 inches. For chicken wire already installed, overlay with hardware cloth from grade to 36 inches, tie off every 8 inches, and add an apron of 18–24 inches around the base.
Sagging panels: add vertical studs at 24 inches on center and re-stretch mesh, fastening at the new studs. Torn staple lines: replace with washered screws every 2–3 inches. Gaps at roof-wall intersections: bridge with a continuous strip of hardware cloth bent to a 90-degree angle and screwed off along both legs.
Predator chewing at corners: cap exposed edges with 1×2 lumber screwed through to framing every 8 inches. Chicken wire already installed: overlay with hardware cloth from grade to 36 inches, tie off every 8 inches, and add an apron of 18–24 inches around the base.
Audit Checklist You Can Walk Tonight
A systematic walkthrough covers vents and windows (1/2-inch, 19-gauge hardware cloth, no gap over 1/4 inch), run walls (armored to at least 36 inches), the apron (18–24 inches out, pinned every 12 inches, buried 2–3 inches), doors (two-step latches, clearances under 1/4 inch), mesh fasteners (washered screws every 2–3 inches on edges), the roof (solid or hardware cloth, not chicken wire), and rust (replace any piece where a pencil can push through).
- All vents, windows, and openings covered with 1/2-inch, 19-gauge hardware cloth; no gap over 1/4 inch.
- Run walls armored with hardware cloth to at least 36 inches from grade; upper walls secure or roof fully enclosed.
- Apron installed: 18–24 inches out, pinned every 12 inches, buried under 2–3 inches of soil or gravel.
- Doors have two-step latches; clearances under 1/4 inch; hinges tight.
- Mesh fastened with washered screws every 2–3 inches on edges; overlaps stitched every 4 inches.
- Roof is solid or hardware cloth, not chicken wire; no gaps along eaves or ridge.
- No rusted-through sections; replace any piece where a pencil can push through.
Frequently Asked Questions
Is hardware cloth or chicken wire better for a chicken run?
Hardware cloth is the correct choice for predator-proofing a run. Use 1/2-inch, 19-gauge on the lower 36 inches at minimum, plus an 18–24 inch apron. Chicken wire is only for keeping birds in, not predators out.
What gauge hardware cloth should I use on my coop?
Use 19 gauge as the baseline for walls, vents, and doors. If you face strong predators or heavy snow/wind loads, step up to 16 gauge for doors and lower walls. For small vents in weasel country, add 1/4-inch mesh panels.
Can I put chicken wire over hardware cloth to save money?
Putting chicken wire over hardware cloth adds no strength. If you need to economize, armor the lower 36 inches and all openings with hardware cloth first, then use a larger welded wire (like 2-by-4-inch) above. Skip chicken wire for security layers.
How deep should I bury hardware cloth to stop digging predators?
Use an apron 18–24 inches out from the wall and cover it with soil or gravel. If you prefer a trench, go at least 12 inches down with a 6-inch outward footer. Aprons are faster and handle frost better.
Will 1-inch chicken wire keep raccoons out of my coop?
No. Raccoons tear 20–22 gauge chicken wire and reach through 1-inch openings. Cover all access points with 1/2-inch, 19-gauge hardware cloth and lock doors with two-step latches.
Do I need hardware cloth on the roof of the run?
Yes, unless you install a solid roof. A hardware cloth lid fastened every 6 inches to rafters on 24-inch centers stops climb-ins and aerial predators. Chicken wire overhead is not sufficient.
Quick Comparison: Hardware Cloth vs. Chicken Wire
| Feature | Hardware Cloth | Chicken Wire |
| Mesh shape | Square, welded at every intersection | Hexagonal, twisted at joints |
| Typical gauge | 16–23 gauge (lower = stronger) | 20–22 gauge (lightweight) |
| Mesh opening | 1/4-inch, 1/2-inch, 1-inch | 1-inch, 1.5-inch, 2-inch |
| Predator resistance | Resists chewing, prying, clawing | Tears easily under pressure |
| Best use | Exterior predator defense | Keeping chickens in, temporary pens |
| Cost | Higher upfront, buy-once | Cheaper but fails under attack |
Do It Right Once
Hardware cloth keeps predators out; chicken wire keeps chickens in. Start with the doors and the lower three feet, then the apron — one Saturday, measurable progress, and real security. For the full checklist on what to inspect and reinforce, the predator-proof checklist walks through every weak point. Once you’ve chosen the right wire, the predator apron guide shows exactly how to install it. And for the locks and latches that pair with hardware cloth to complete the defense, the raccoon-proofing guide covers the details.